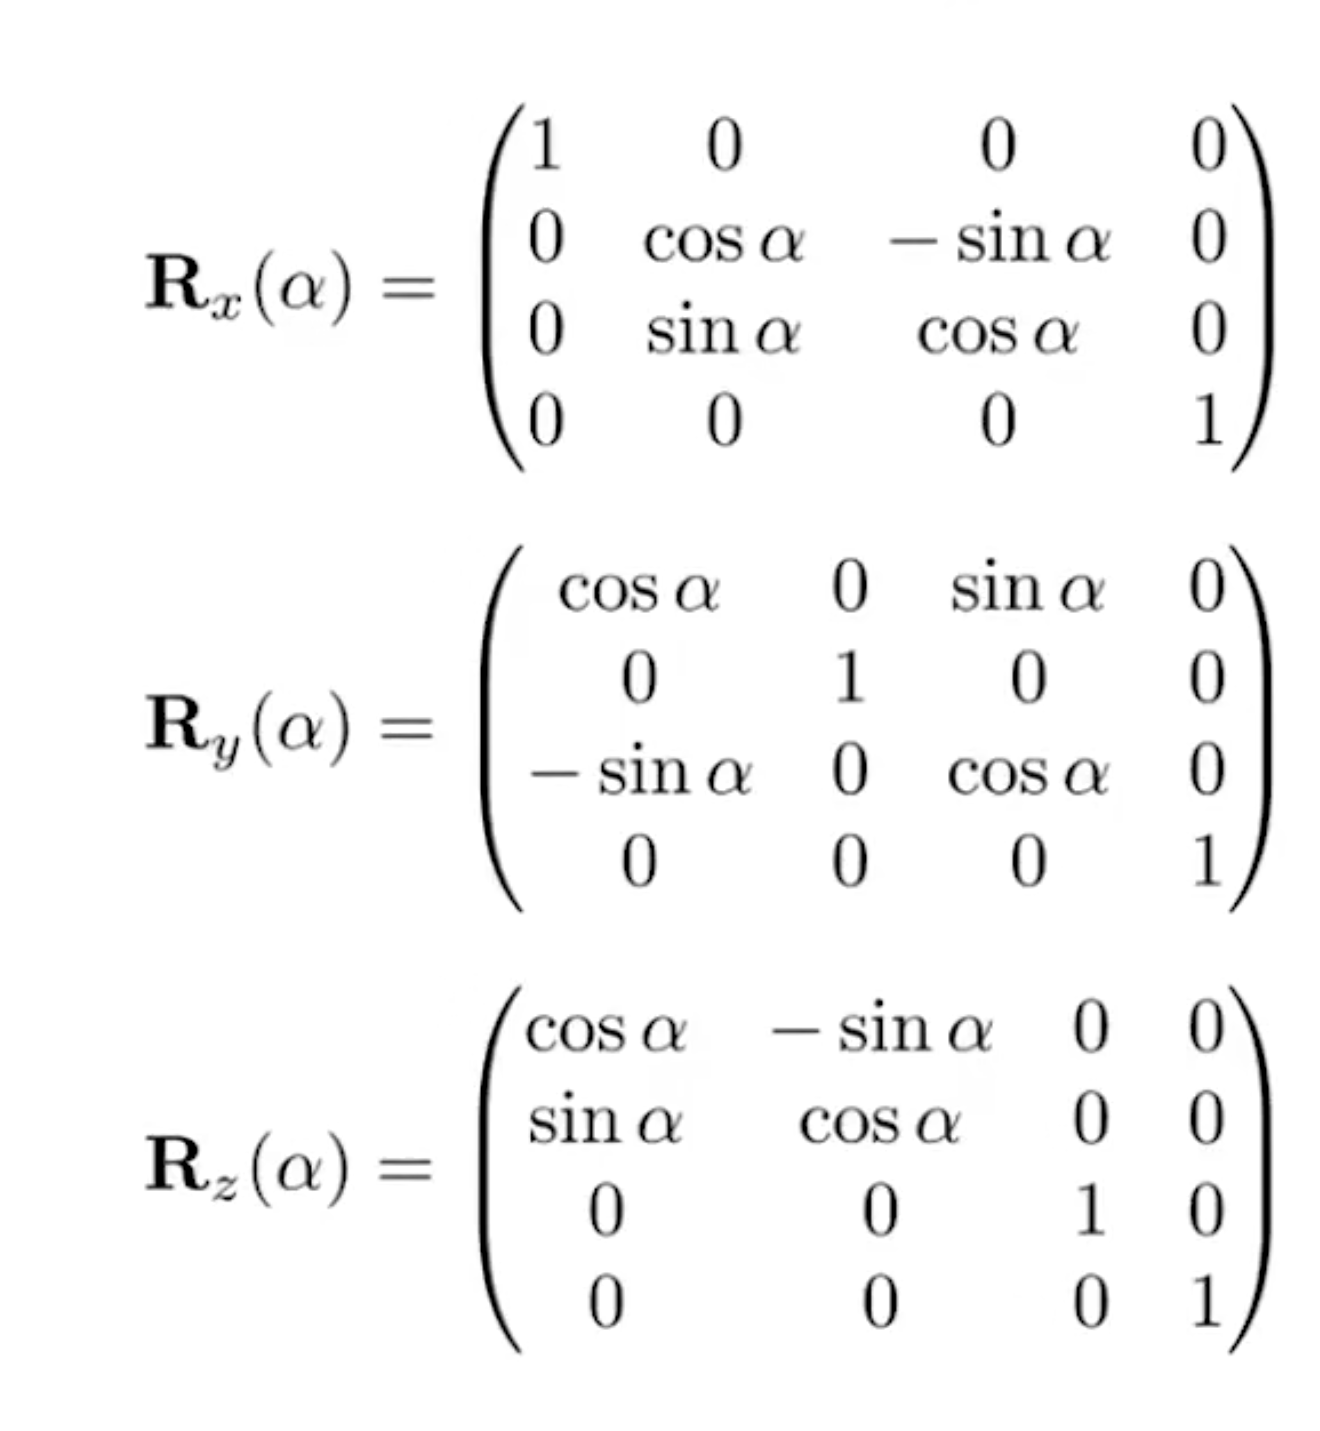
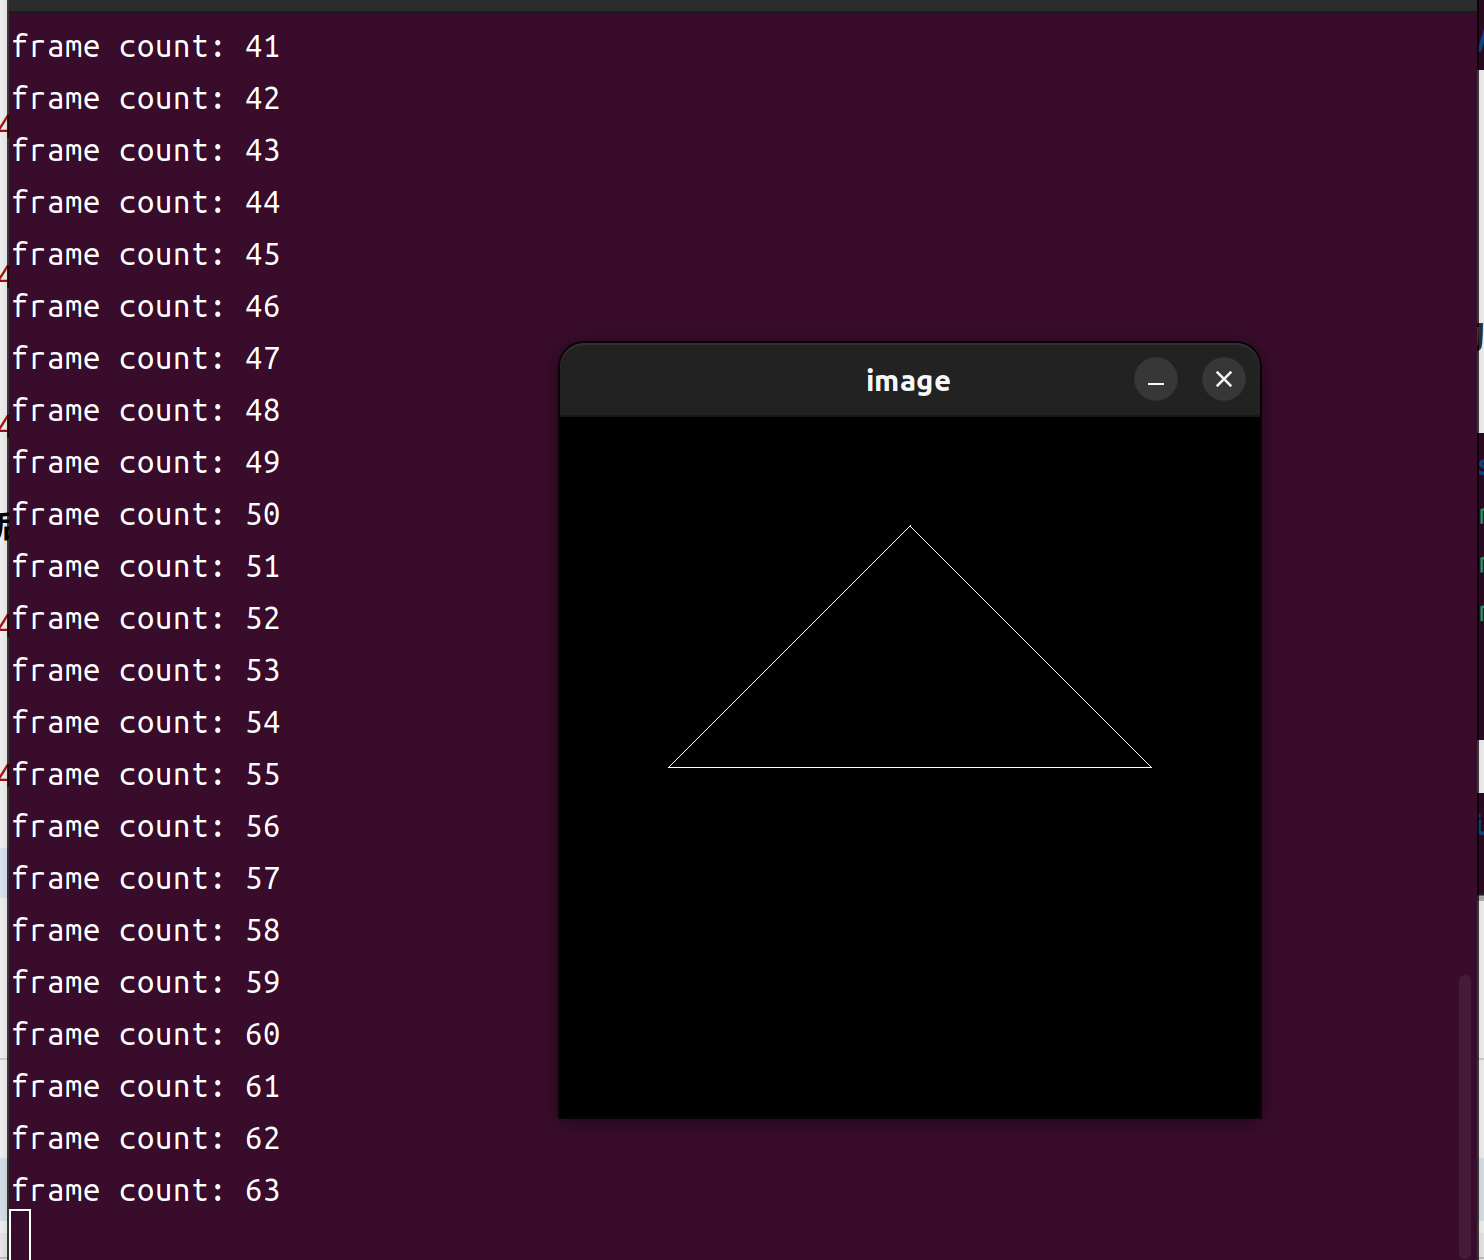
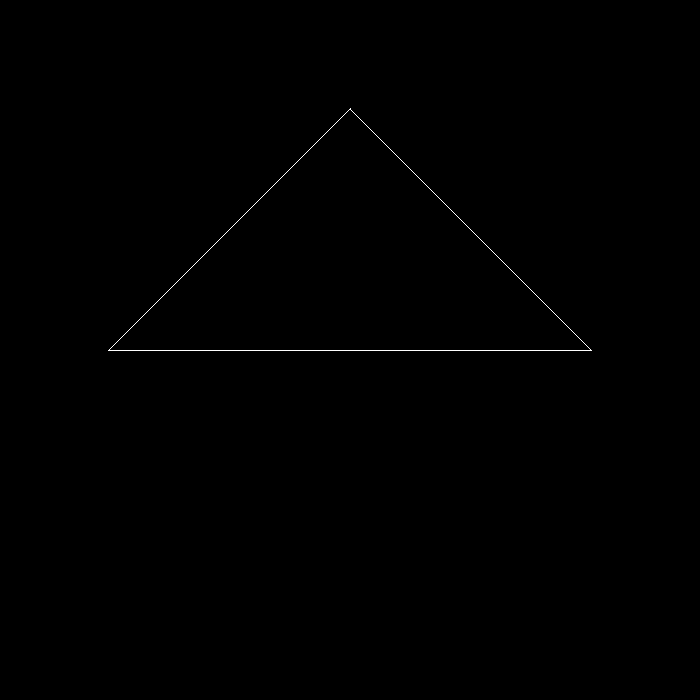
逐个元素地构建模型变换矩阵并返回该矩阵。在此函数中,你只需要实现三维中绕 z 轴旋转的变换矩阵,而不用处理平移与缩放。 这个部分的实现非常简单,只需要记住这个公式就好了。这里给出绕三个轴旋转的旋转矩阵:
代码实现:
1
2
3
4
5
6
7
8
9
10
11
12
13
14
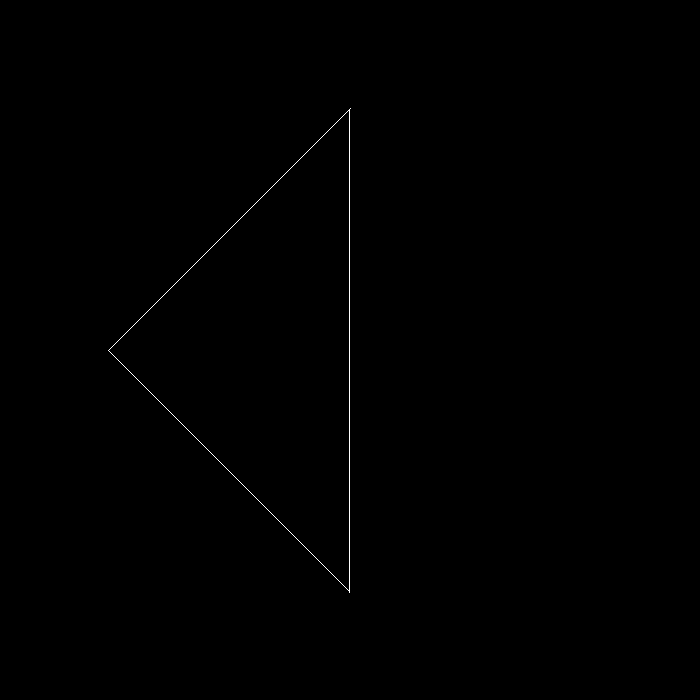
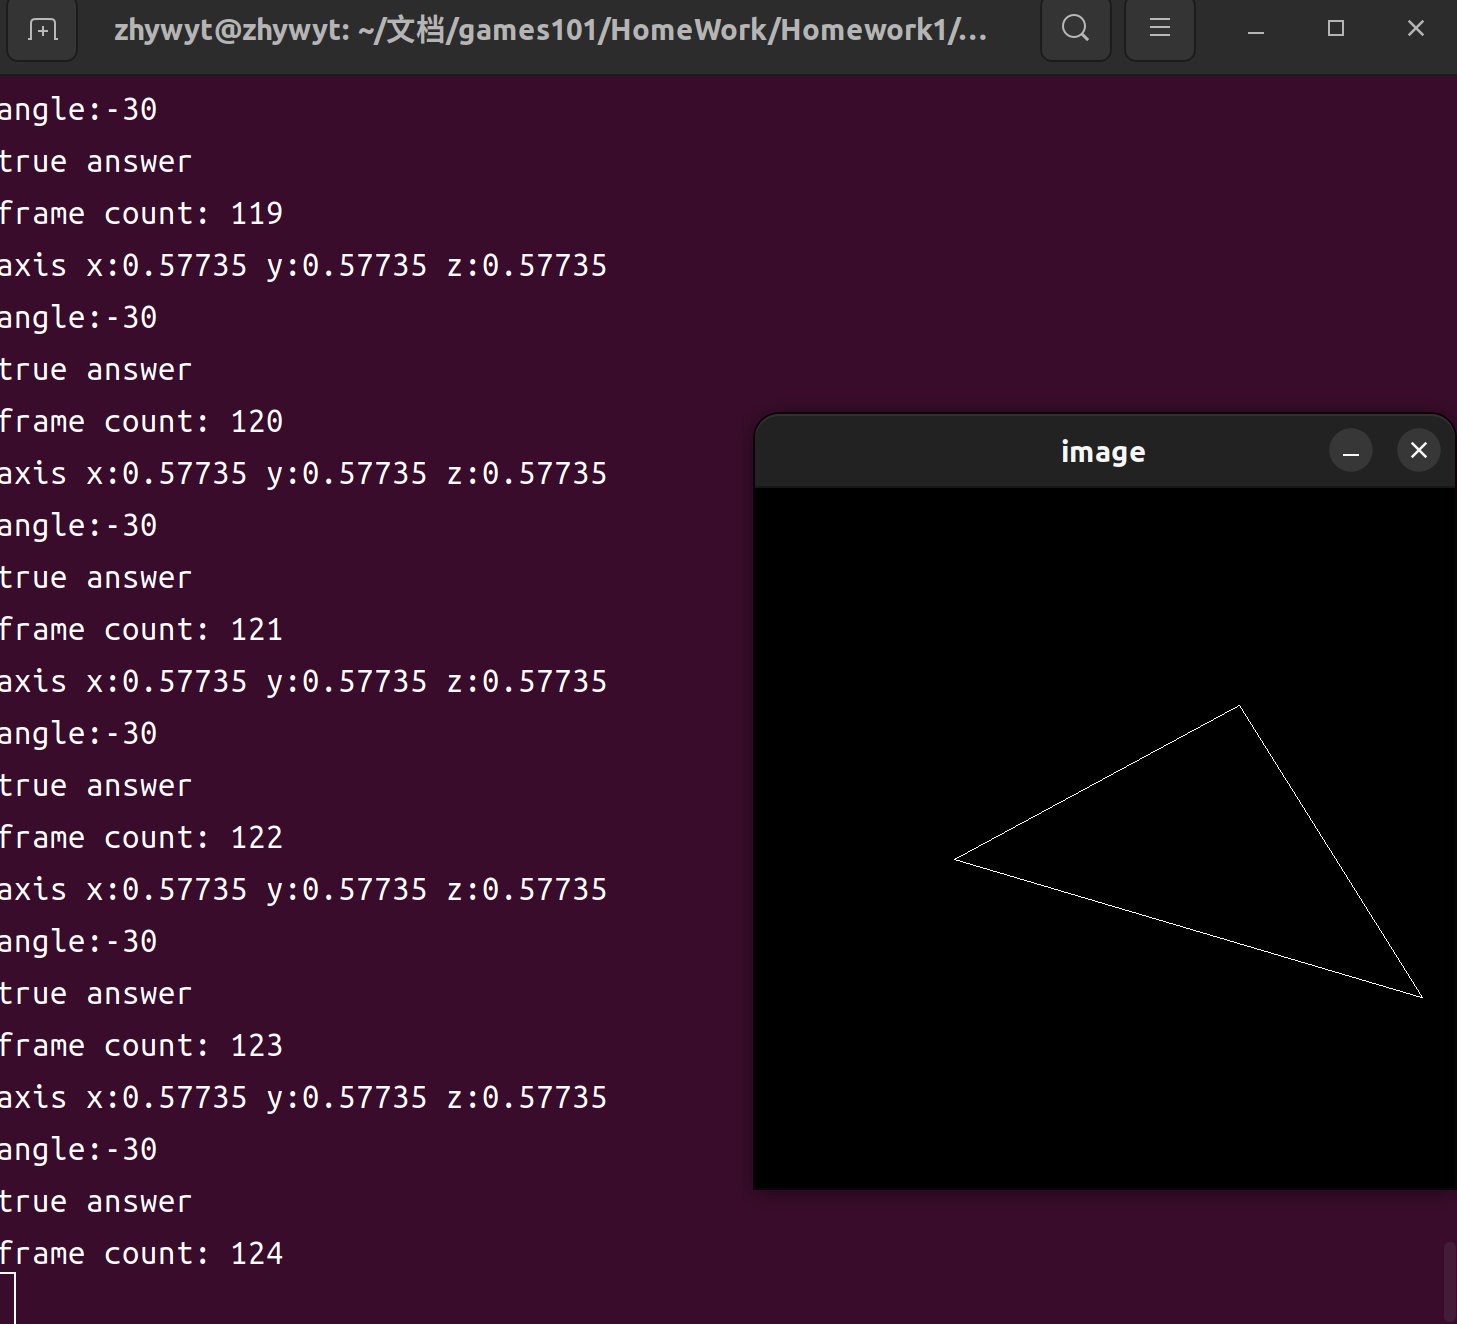
Eigen::Matrix4f get_model_matrix(float rotation_angle)
{
    Eigen::Matrix4f model = Eigen::Matrix4f::Identity();
	//角度制转弧度制
    rotation_angle = rotation_angle / 180.0f * MY_PI;
    // TODO: Implement this function
    // Create the model matrix for rotating the triangle around the Z axis.
    // Then return it.
    model << cos(rotation_angle), -sin(rotation_angle), 0, 0,
        sin(rotation_angle), cos(rotation_angle), 0, 0,
        0, 0, 1, 0,
        0, 0, 0, 1;
    return model;
}
//main.cpp bool ProjectMode=true;//这是一个控制模式的参数 Eigen::Matrix4f get_model_matrix(float rotation_angle) { Eigen::Matrix4f model = Eigen::Matrix4f::Identity(); rotation_angle = rotation_angle / 180.0f * MY_PI; // TODO: Implement this function // Create the model matrix for rotating the triangle around the Z axis. // Then return it. model << cos(rotation_angle), -sin(rotation_angle), 0, 0, sin(rotation_angle), cos(rotation_angle), 0, 0, 0, 0, 1, 0, 0, 0, 0, 1; return model; } Eigen::Matrix4f get_projection_matrix(float eye_fov, float aspect_ratio, float zNear, float zFar) { // Students will implement this function
Eigen::Matrix4f get_model_matrix(float rotation_angle) { Eigen::Matrix4f model = Eigen::Matrix4f::Identity(); rotation_angle = rotation_angle / 180.0f * MY_PI; // TODO: Implement this function // Create the model matrix for rotating the triangle around the Z axis. // Then return it. model << cos(rotation_angle), -sin(rotation_angle), 0, 0, sin(rotation_angle), cos(rotation_angle), 0, 0, 0, 0, 1, 0, 0, 0, 0, 1; return model; }
/* For the curious : The draw function takes two buffer id's as its arguments. These two structs make sure that if you mix up with their orders, the compiler won't compile it. Aka : Type safety */ /* 对于感兴趣的人 : draw 函数接受两个缓冲区ID作为参数。 这些两个结构体确保如果将它们顺序混乱,编译器不会编译它。 又名 : 类型安全 */ structpos_buf_id{ int pos_id = 0; }; structind_buf_id{ int ind_id = 0; };
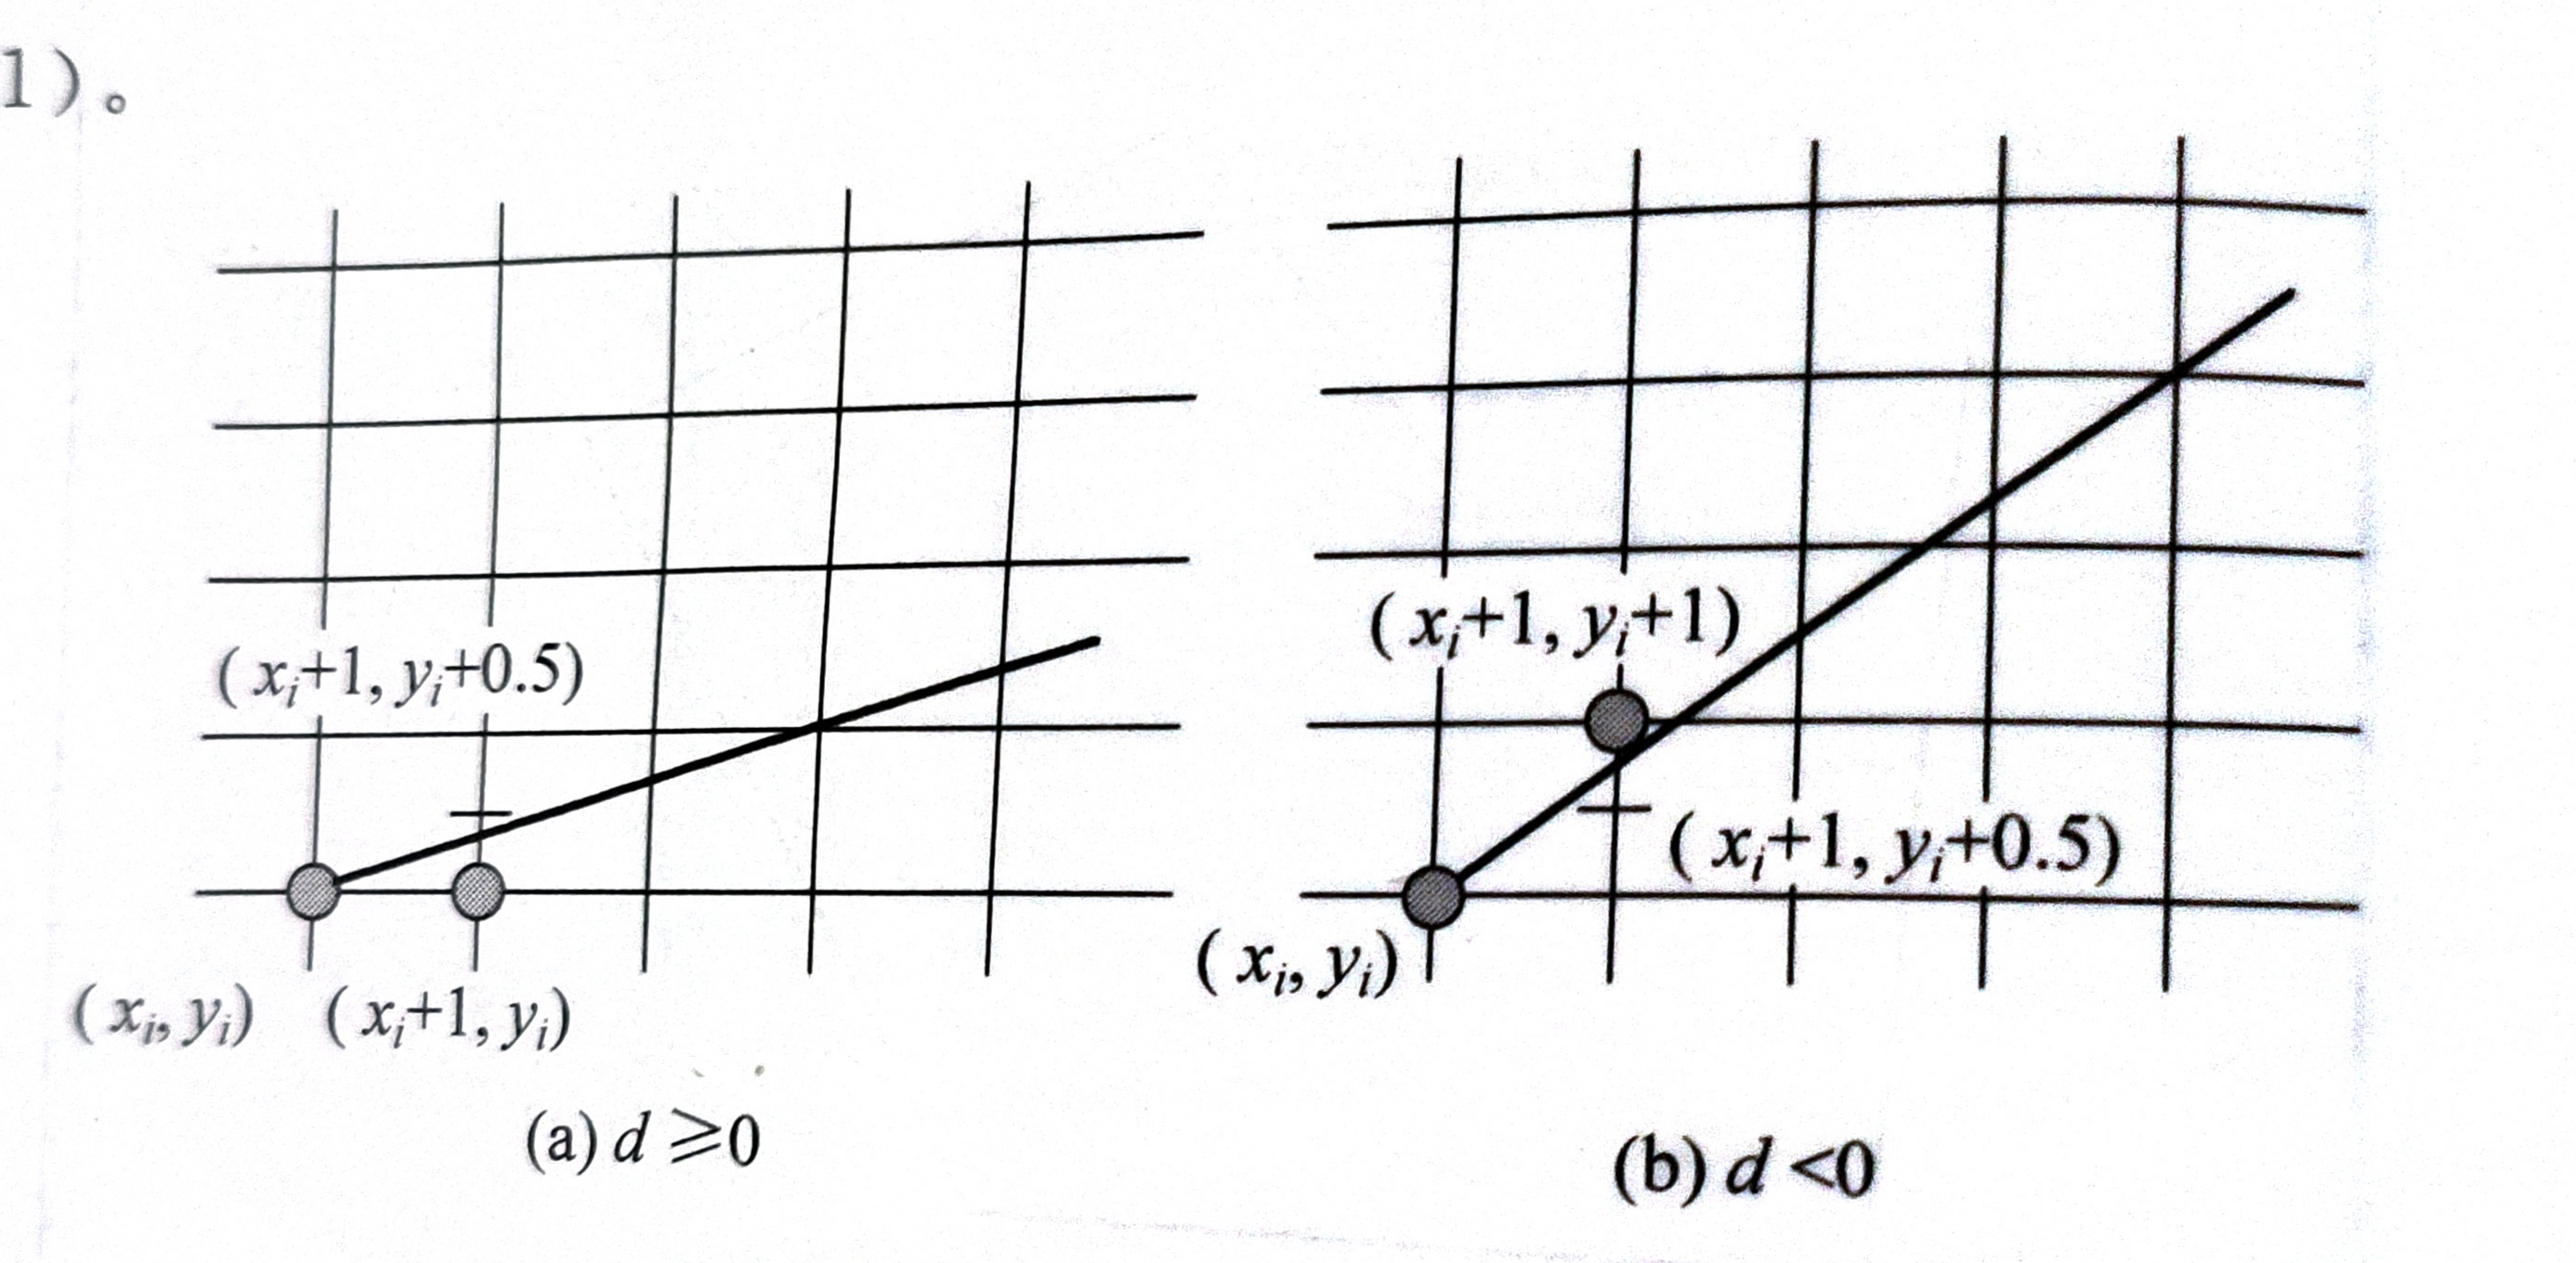
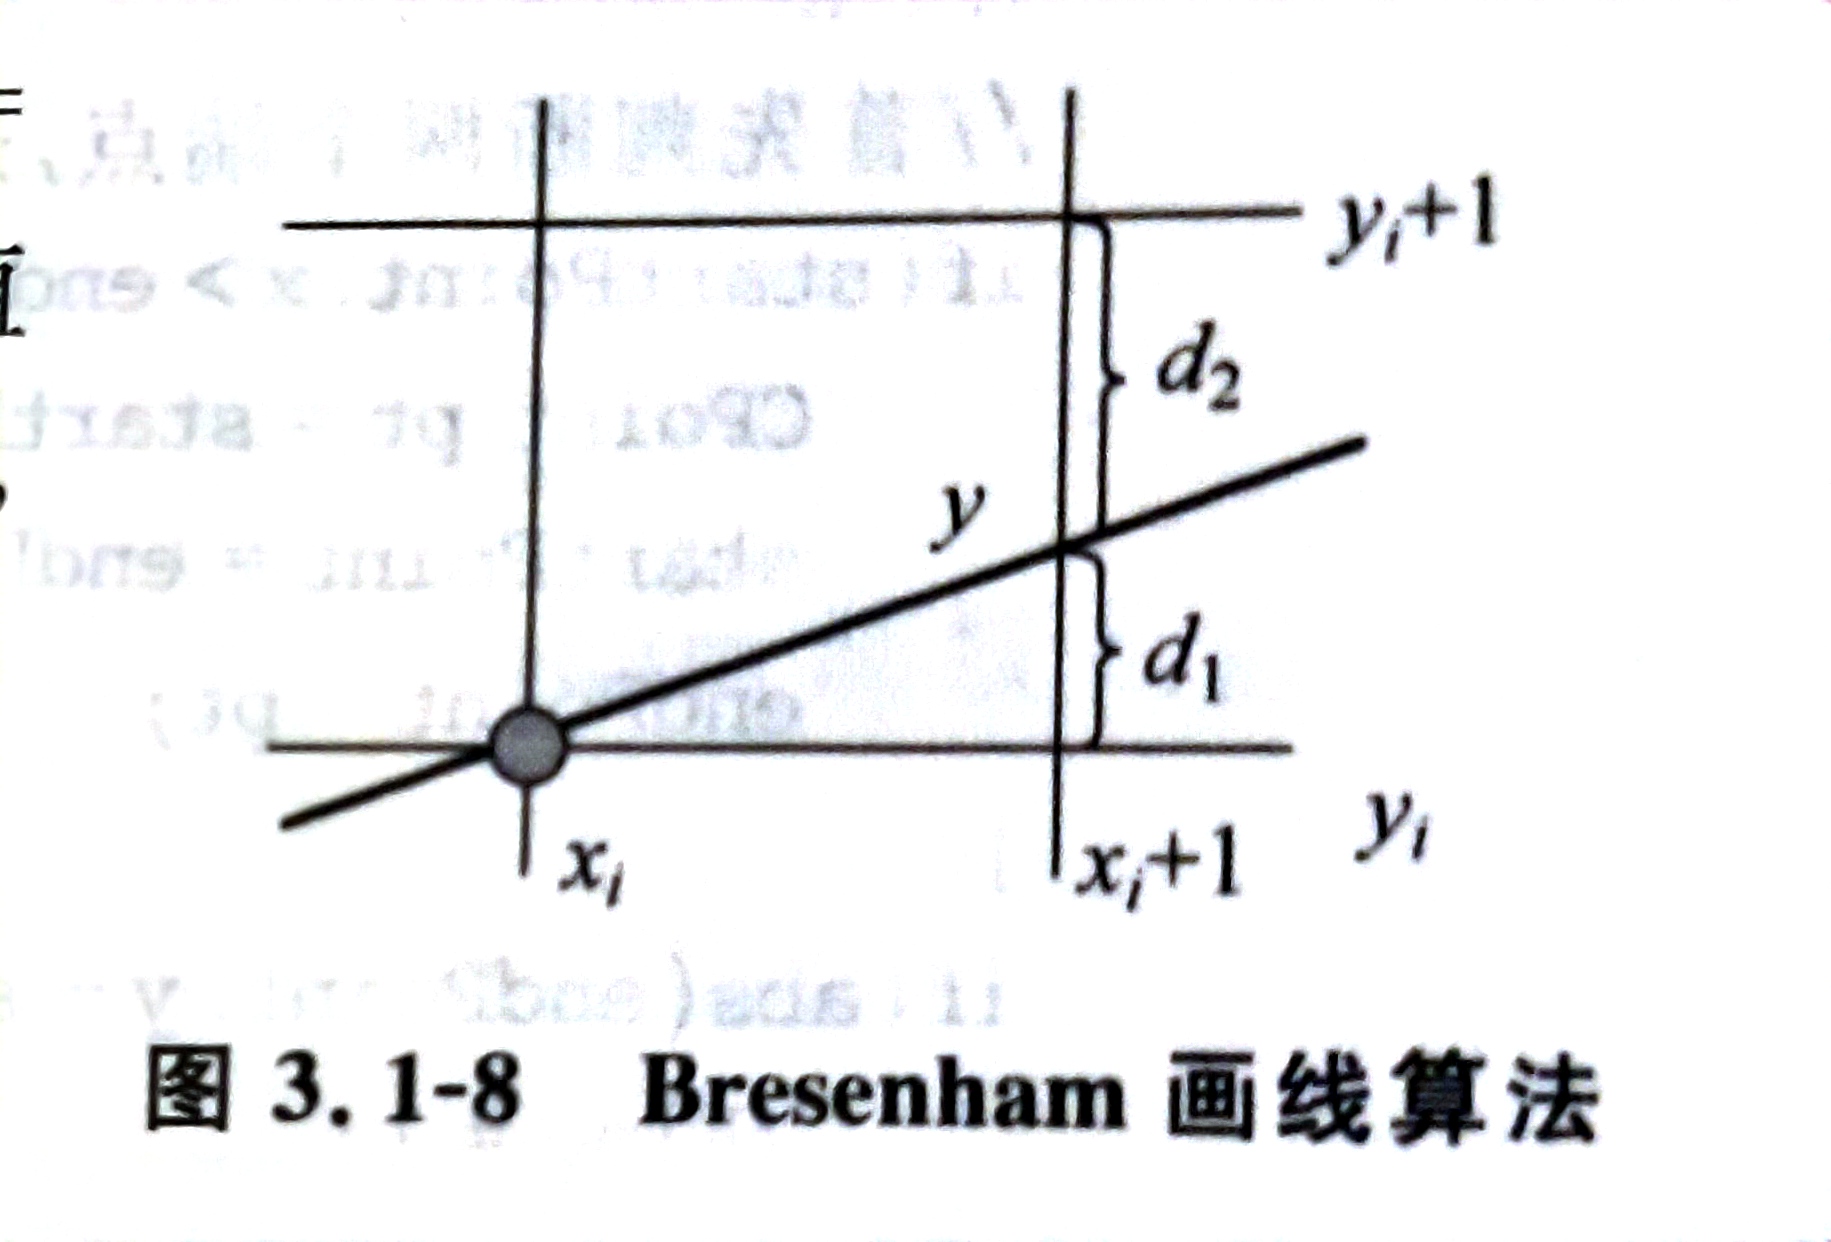
if (startx != endx && starty != endy) { bool kFlag = 0; //斜率是否大于1 int sFlag = 1; //斜率的正负 if (startx > endx) { //因为算法是x递增的,所以要保持起点x在终点左边 int tempx = startx, tempy = starty; startx = endx, starty = endy; endx = tempx, endy = tempy; } if (abs(starty - endy) > abs(startx - endx)) { kFlag = true; } if (starty > endy) { //标记斜率小于零 sFlag = -1; } int a, b, TA, TAB, d, x, y; if (sFlag == -1) endy = starty + (starty - endy);
a = starty - endy; b = endx - startx; TA = 2 * a; //twoA TAB = 2 * (a + b); //twoAB d = 2 * a + b; x = startx, y = starty; if (!kFlag) { for (int i = 0; i < (endx - startx); i++) { if (d >= 0) { glVertex2i(++x, y); d += TA; } else { glVertex2i(++x, y += sFlag); d += TAB; } } } elseif (kFlag) { if (kFlag == 1) { TA = 2 * b; d = 2 * b + a; } for (int i = 0; i < abs(endy - starty); i++) { if (d >= 0) { glVertex2i(++x, y += sFlag); d += TAB; } else { glVertex2i(x, y += sFlag); d += TA; } } } }
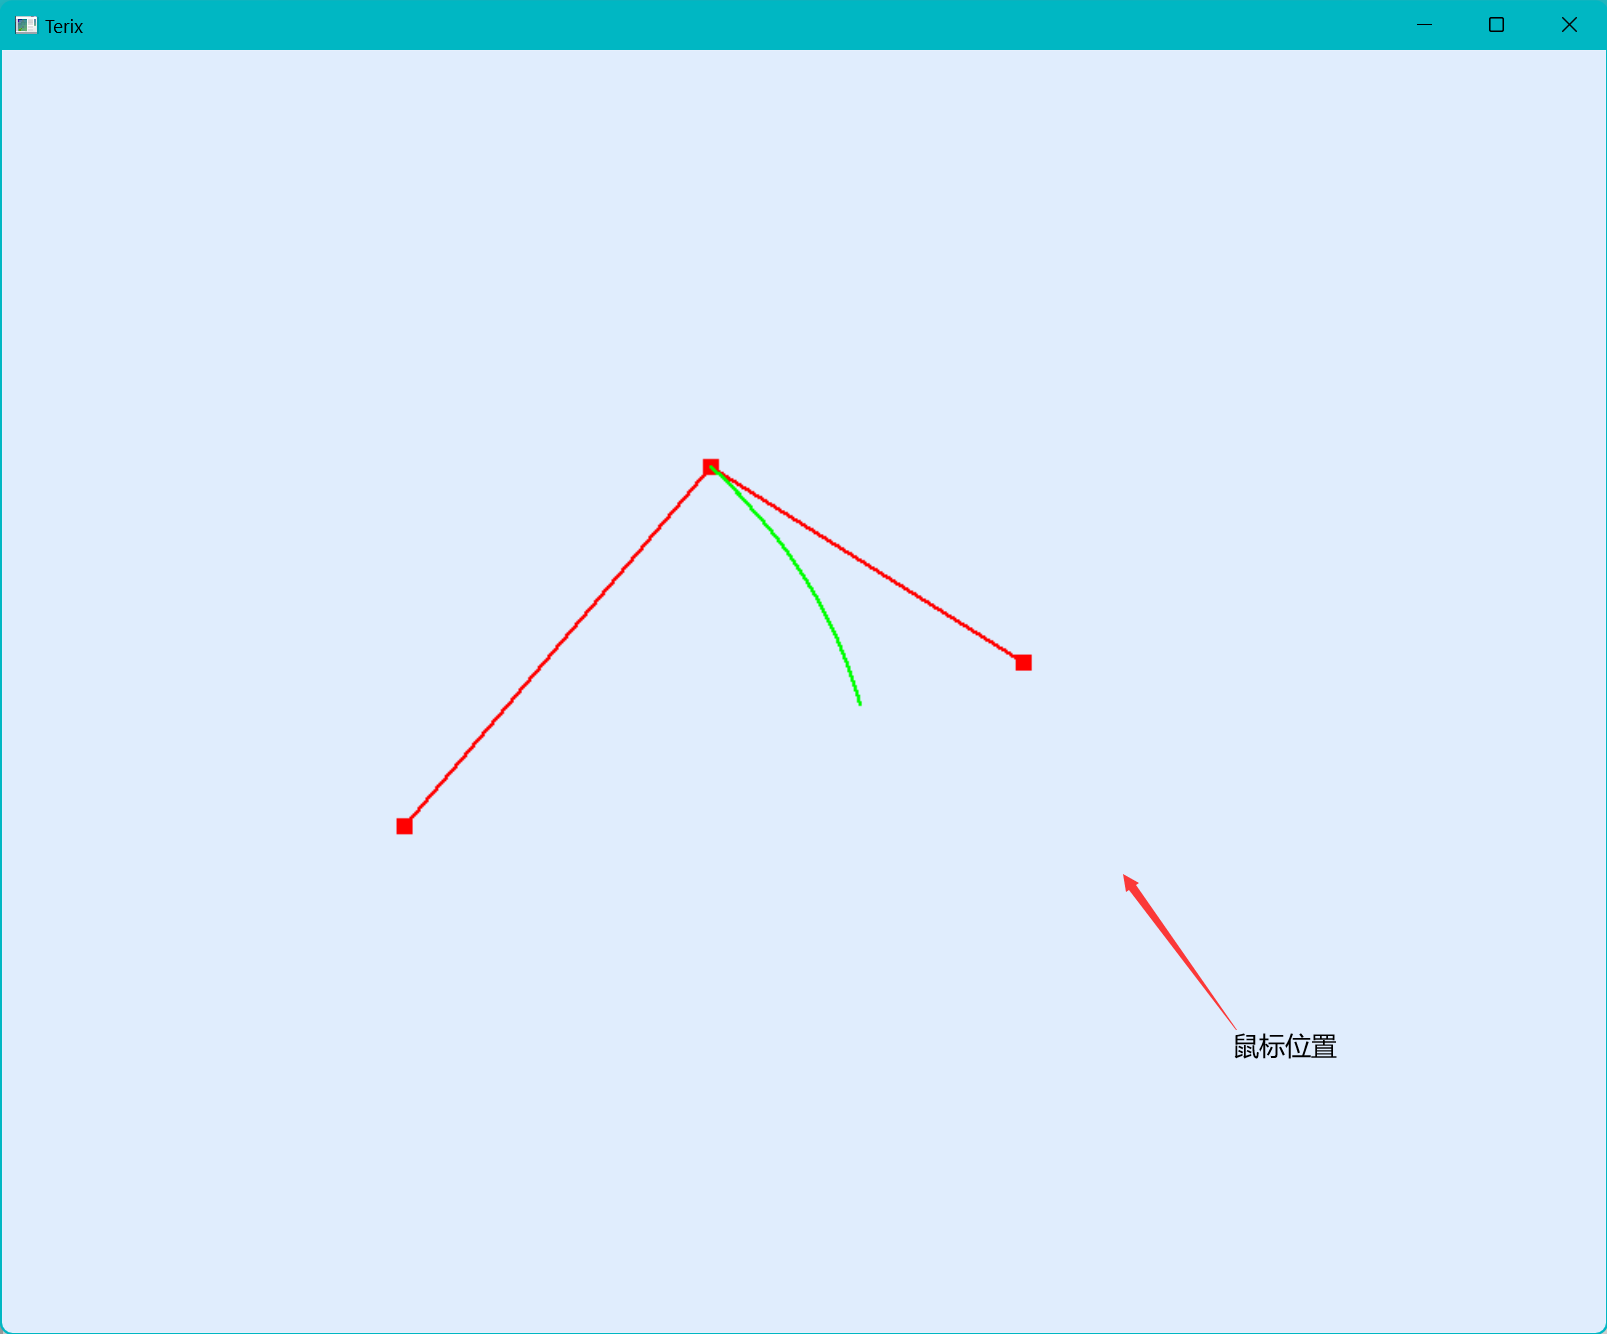
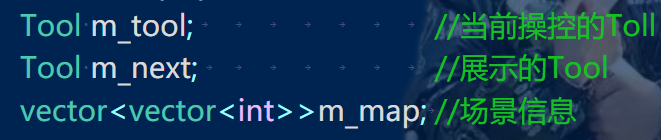
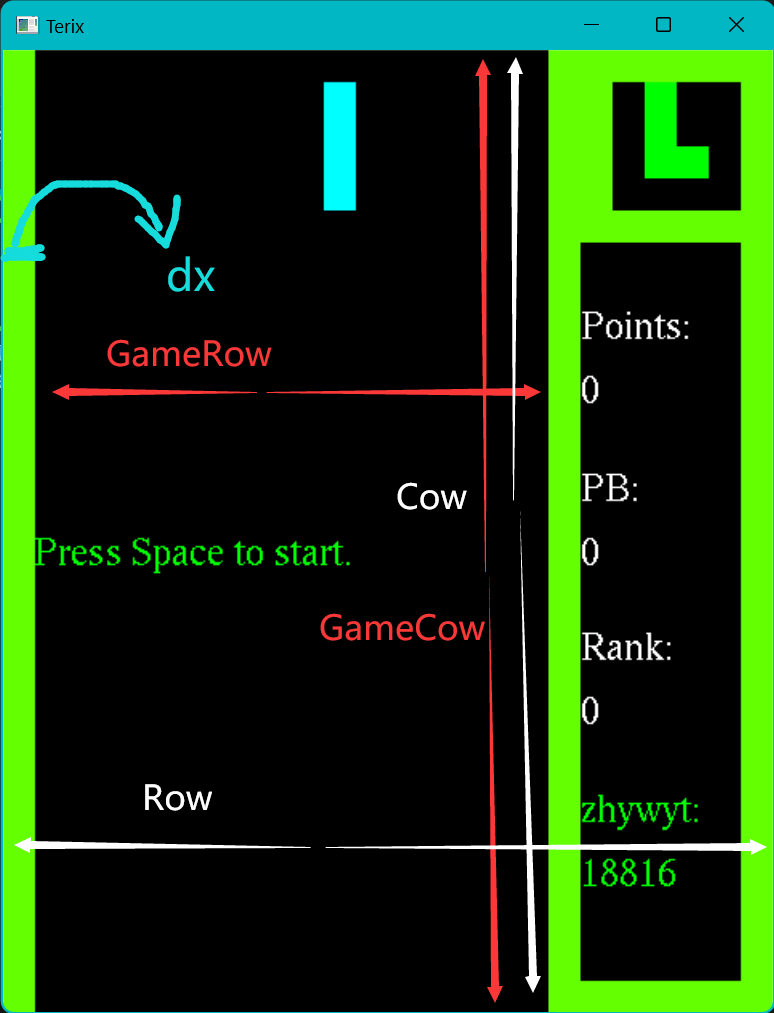
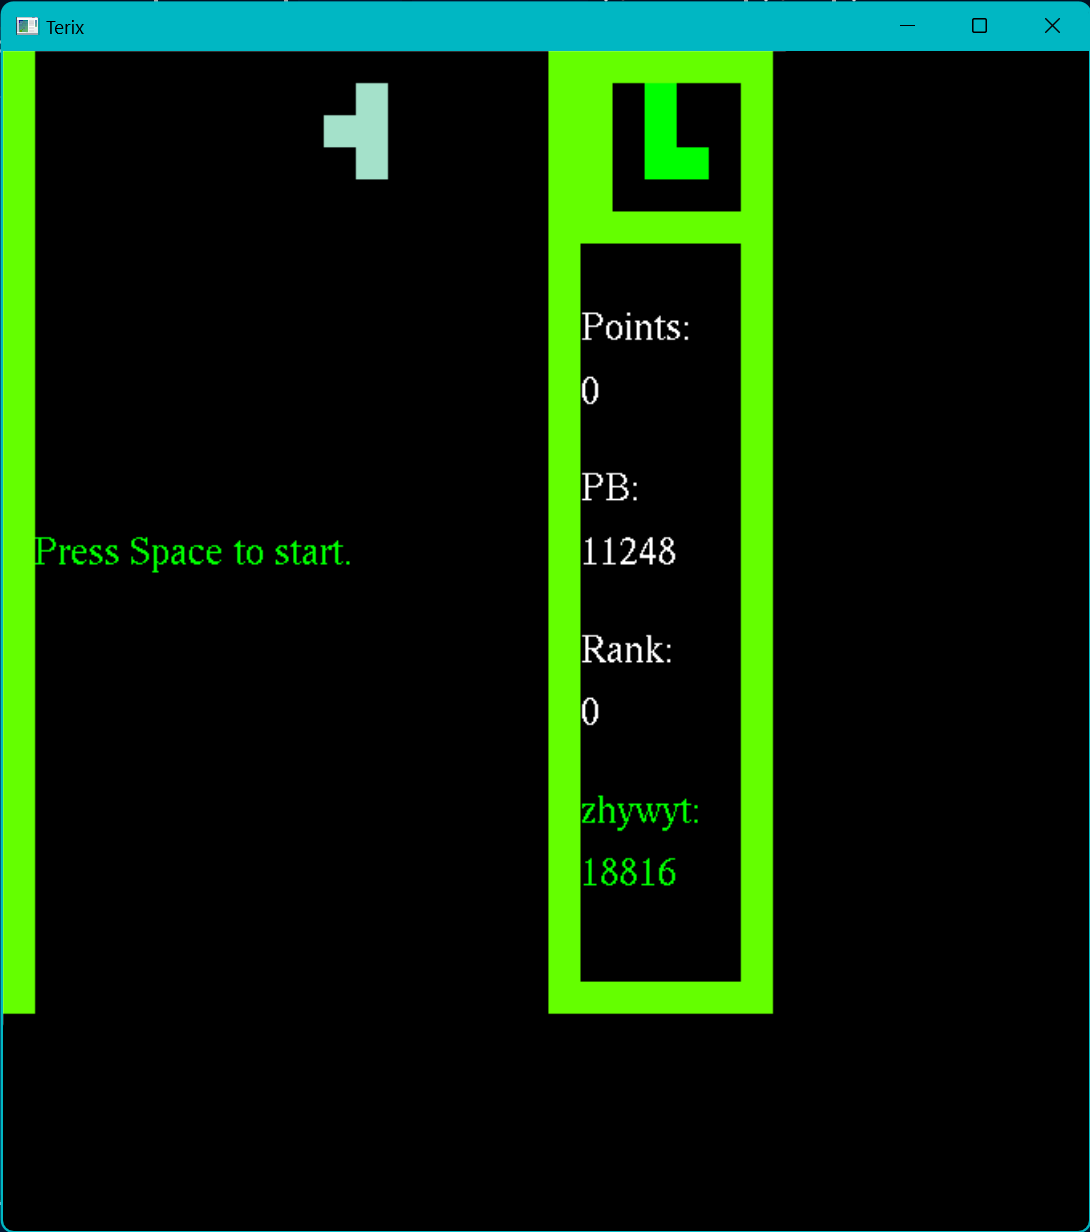
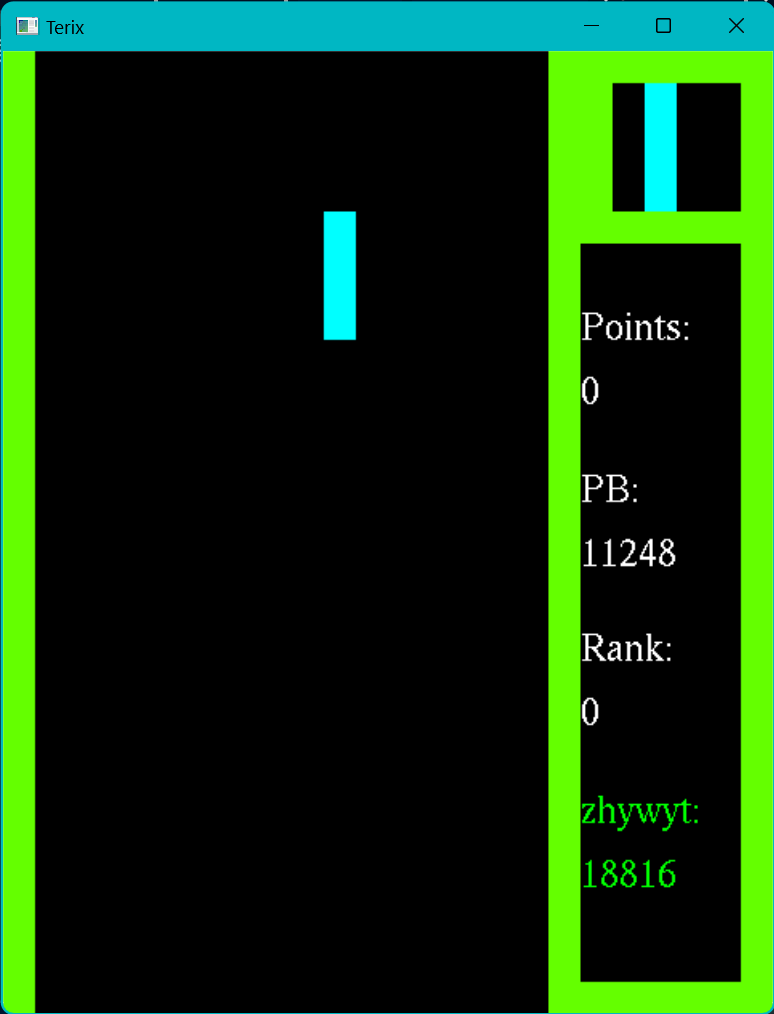
首先我们来分析一下俄罗斯方块这个游戏的场景和运行逻辑: 这里分为了三个方块单位,和一些文字单位,可以看到,蓝色的俄罗斯方块正在随着时间往下走,白色的预备方块静止在等待区域,那么我们需要两个俄罗斯方块对象来存储他们的信息。再看下面的绿色 L 形状的俄罗斯方块,它已经到底了,和场景融为了一体,那么我们也就不需要一个俄罗斯方块的类来存储它了,可以把它存储在场景中,我们用一个二维向量来存储这个场景的信息。
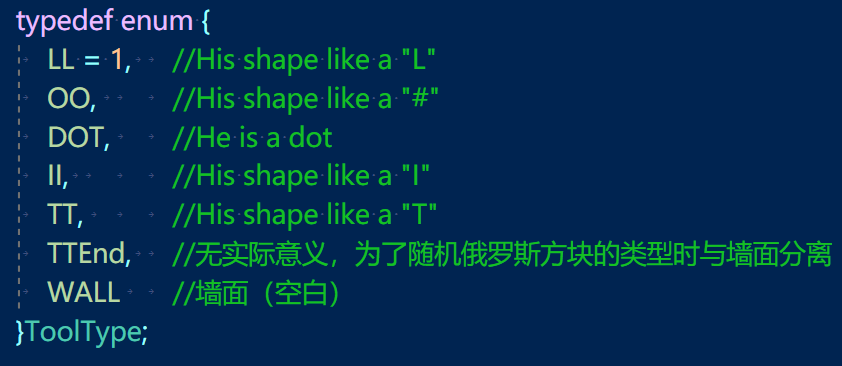
Tool(int x, int y, ToolType type) :_x(x), _y(y), _type(type),run(false) { _data.resize(4, vector<int>(4)); for (int i = 0; i < 4; i++) for (int j = 0; j < 4; j++) _data[i][j] = 0; switch (type) { case LL: for (int i = 0; i <= 2; i++)_data[1][i] = LL; _data[2][2] = LL; break; case OO: for (int i = 1; i <= 2; i++) for (int j = 1; j <= 2; j++) _data[i][j] = OO; break; case DOT: _data[1][1] = DOT; break; case II: for (int i = 0; i < 4; i++)_data[1][i] = II; break; case TT: for (int i = 0; i < 3; i++)_data[2][i] = TT; _data[1][1] = TT; break; } }
friendvoidInput(int data, int x, int y); friendvoidonDisplay(); friendvoidInput(unsignedchar nchar, int x, int y); friendvoidprocessMenuEvents(int option);
//Draw Normal Info if (myGame.status!=PRESTART&&myGame.status!=GAMEOVER&&myGame.status!=GAMEWIN) { //Draw BackGroud for (int i = 0; i < Row; i++) { bool flag = true; for (int j = 0; j < Cow; j++) { switch (myGame.m_map[i][j]) { case0: flag = false; break; case Game::LL: glColor3f(LL_COLOR); break; case Game::OO: glColor3f(OO_COLOR); break; case Game::DOT: glColor3f(DOT_COLOR); break; case Game::II: glColor3f(II_COLOR); break; case Game::TT: glColor3f(TT_COLOR); break; case Game::WALL: glColor3f(WALL_COLOR); break; default: glColor3f(ELSE_COLOR); } if (flag) glRectd(i * NodeSize, j * NodeSize, (i + 1) * NodeSize, (j + 1) * NodeSize); flag = true; } }
//Draw Active Terix switch (myGame.m_tool._type) { case Game::LL: glColor3f(LL_COLOR); break; case Game::OO: glColor3f(OO_COLOR); break; case Game::DOT: glColor3f(DOT_COLOR); break; case Game::II: glColor3f(II_COLOR); break; case Game::TT: glColor3f(TT_COLOR); break; default: glColor3f(ELSE_COLOR); }
for (int i = 0; i < 4; i++) { for (int j = 0; j < 4; j++) { if (myGame.m_tool._data[i][j]) glRectd((myGame.m_tool._x + i) * NodeSize, (myGame.m_tool._y + j) * NodeSize, (myGame.m_tool._x + i + 1) * NodeSize, (myGame.m_tool._y + j + 1) * NodeSize); } } //Draw Waiting Terix switch (myGame.m_next._type) { case Game::LL: glColor3f(LL_COLOR); break; case Game::OO: glColor3f(OO_COLOR); break; case Game::DOT: glColor3f(DOT_COLOR); break; case Game::II: glColor3f(II_COLOR); break; case Game::TT: glColor3f(TT_COLOR); break; default: glColor3f(ELSE_COLOR); }
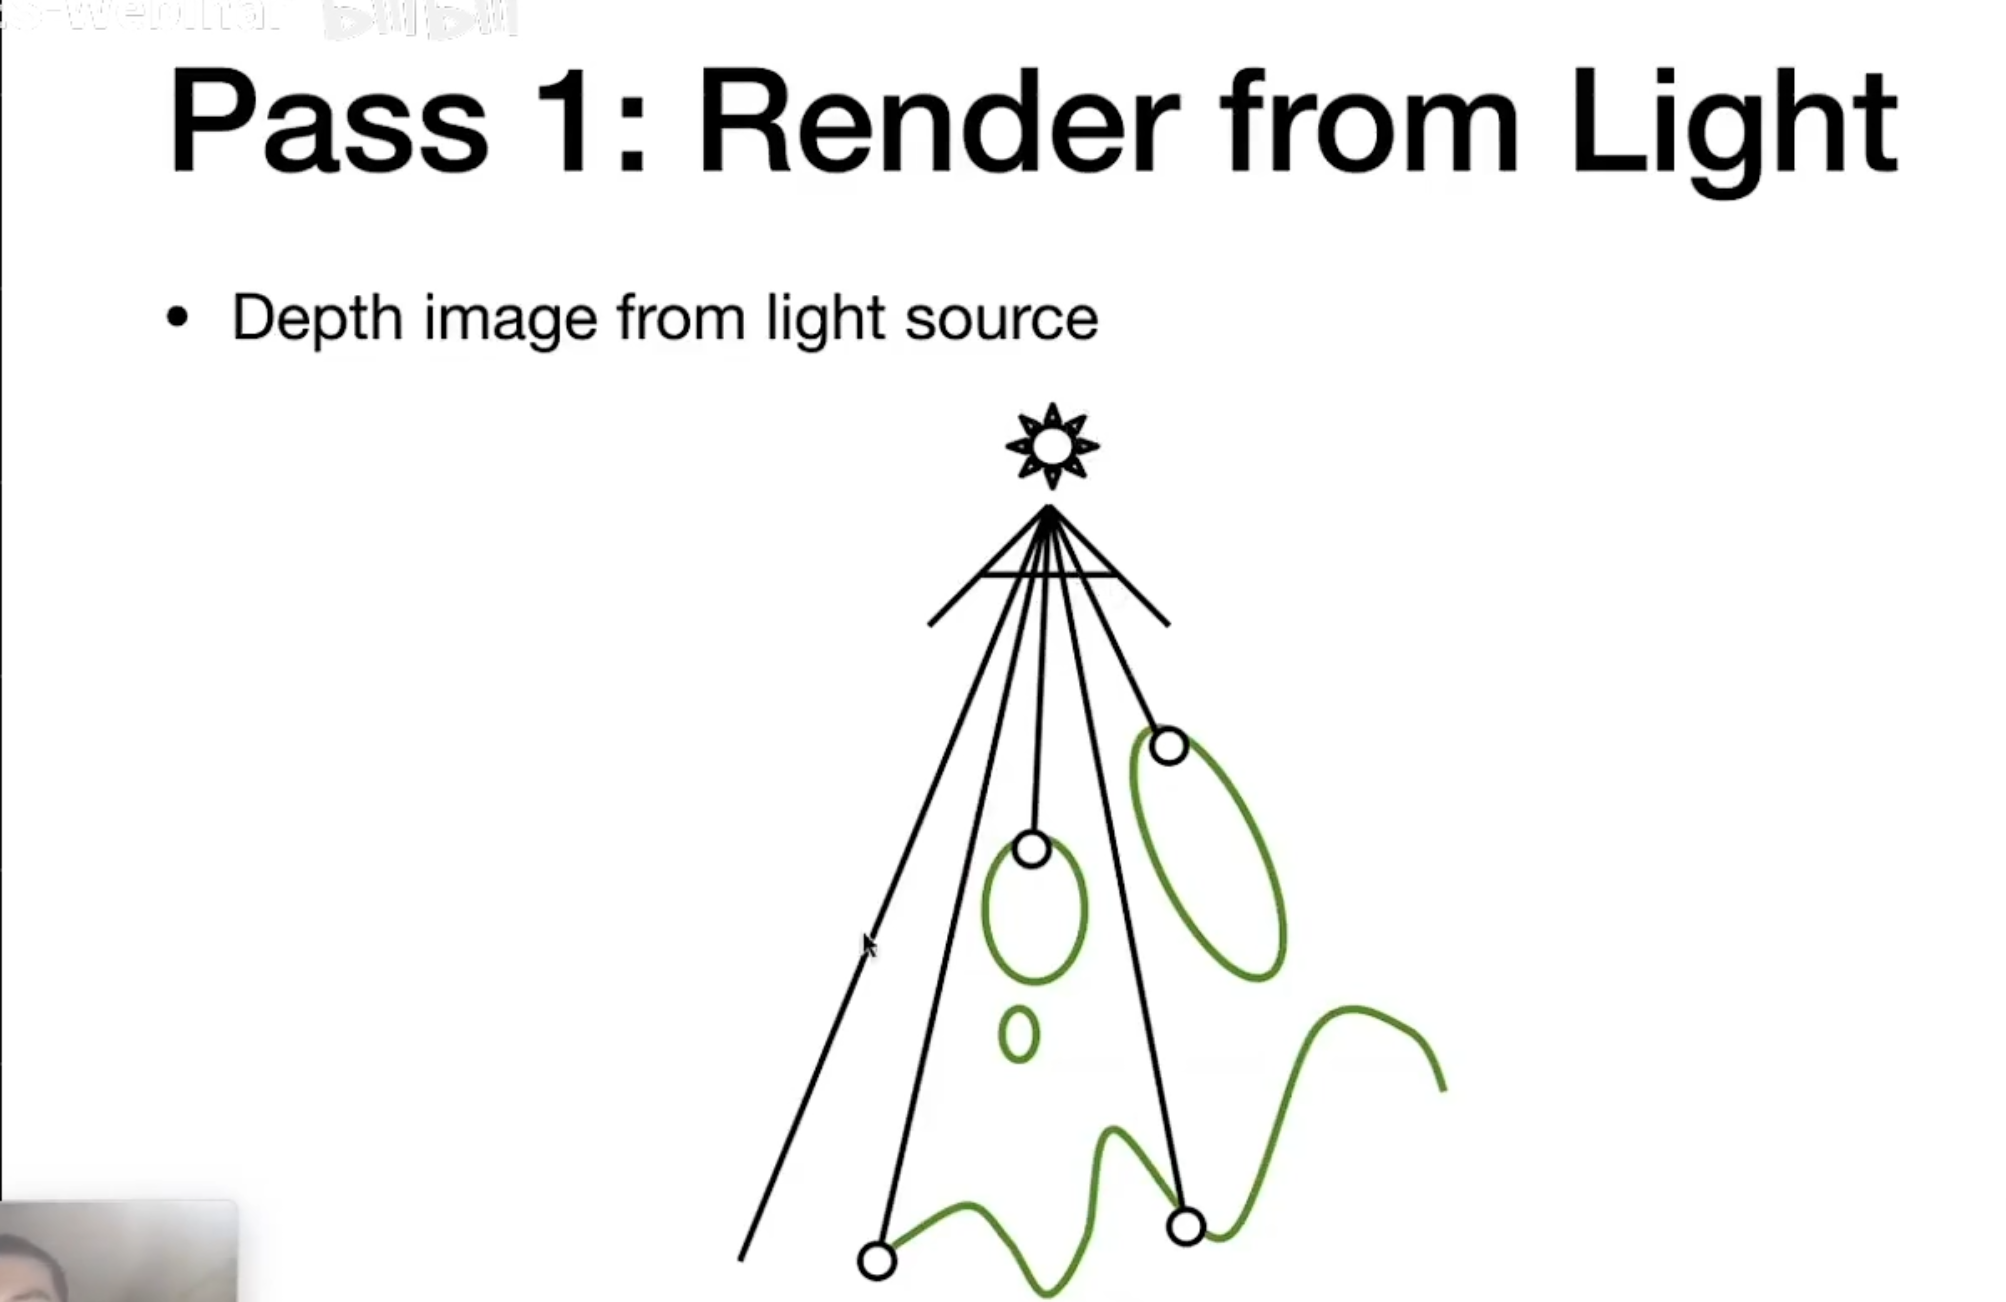
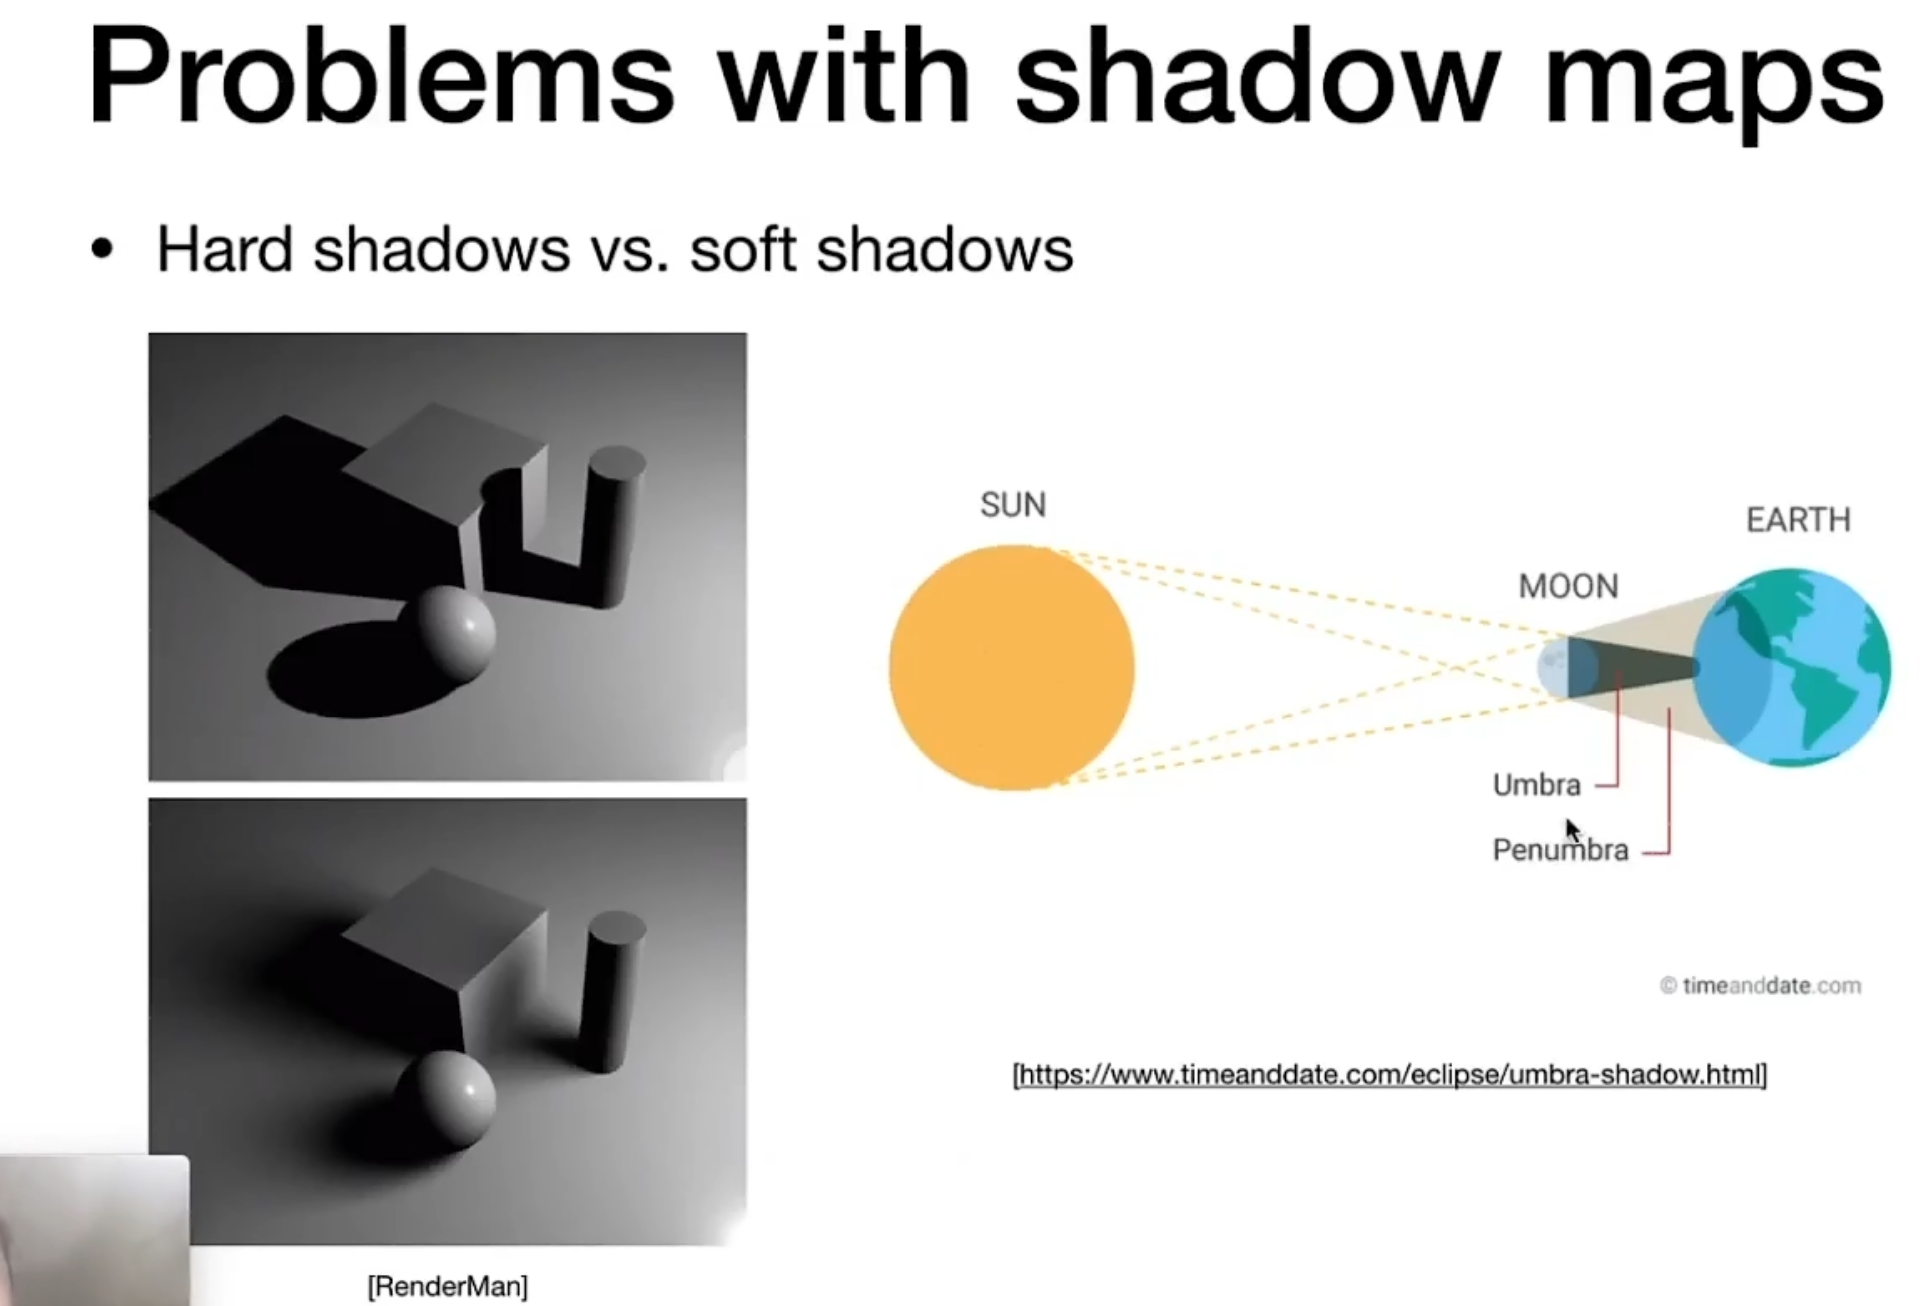
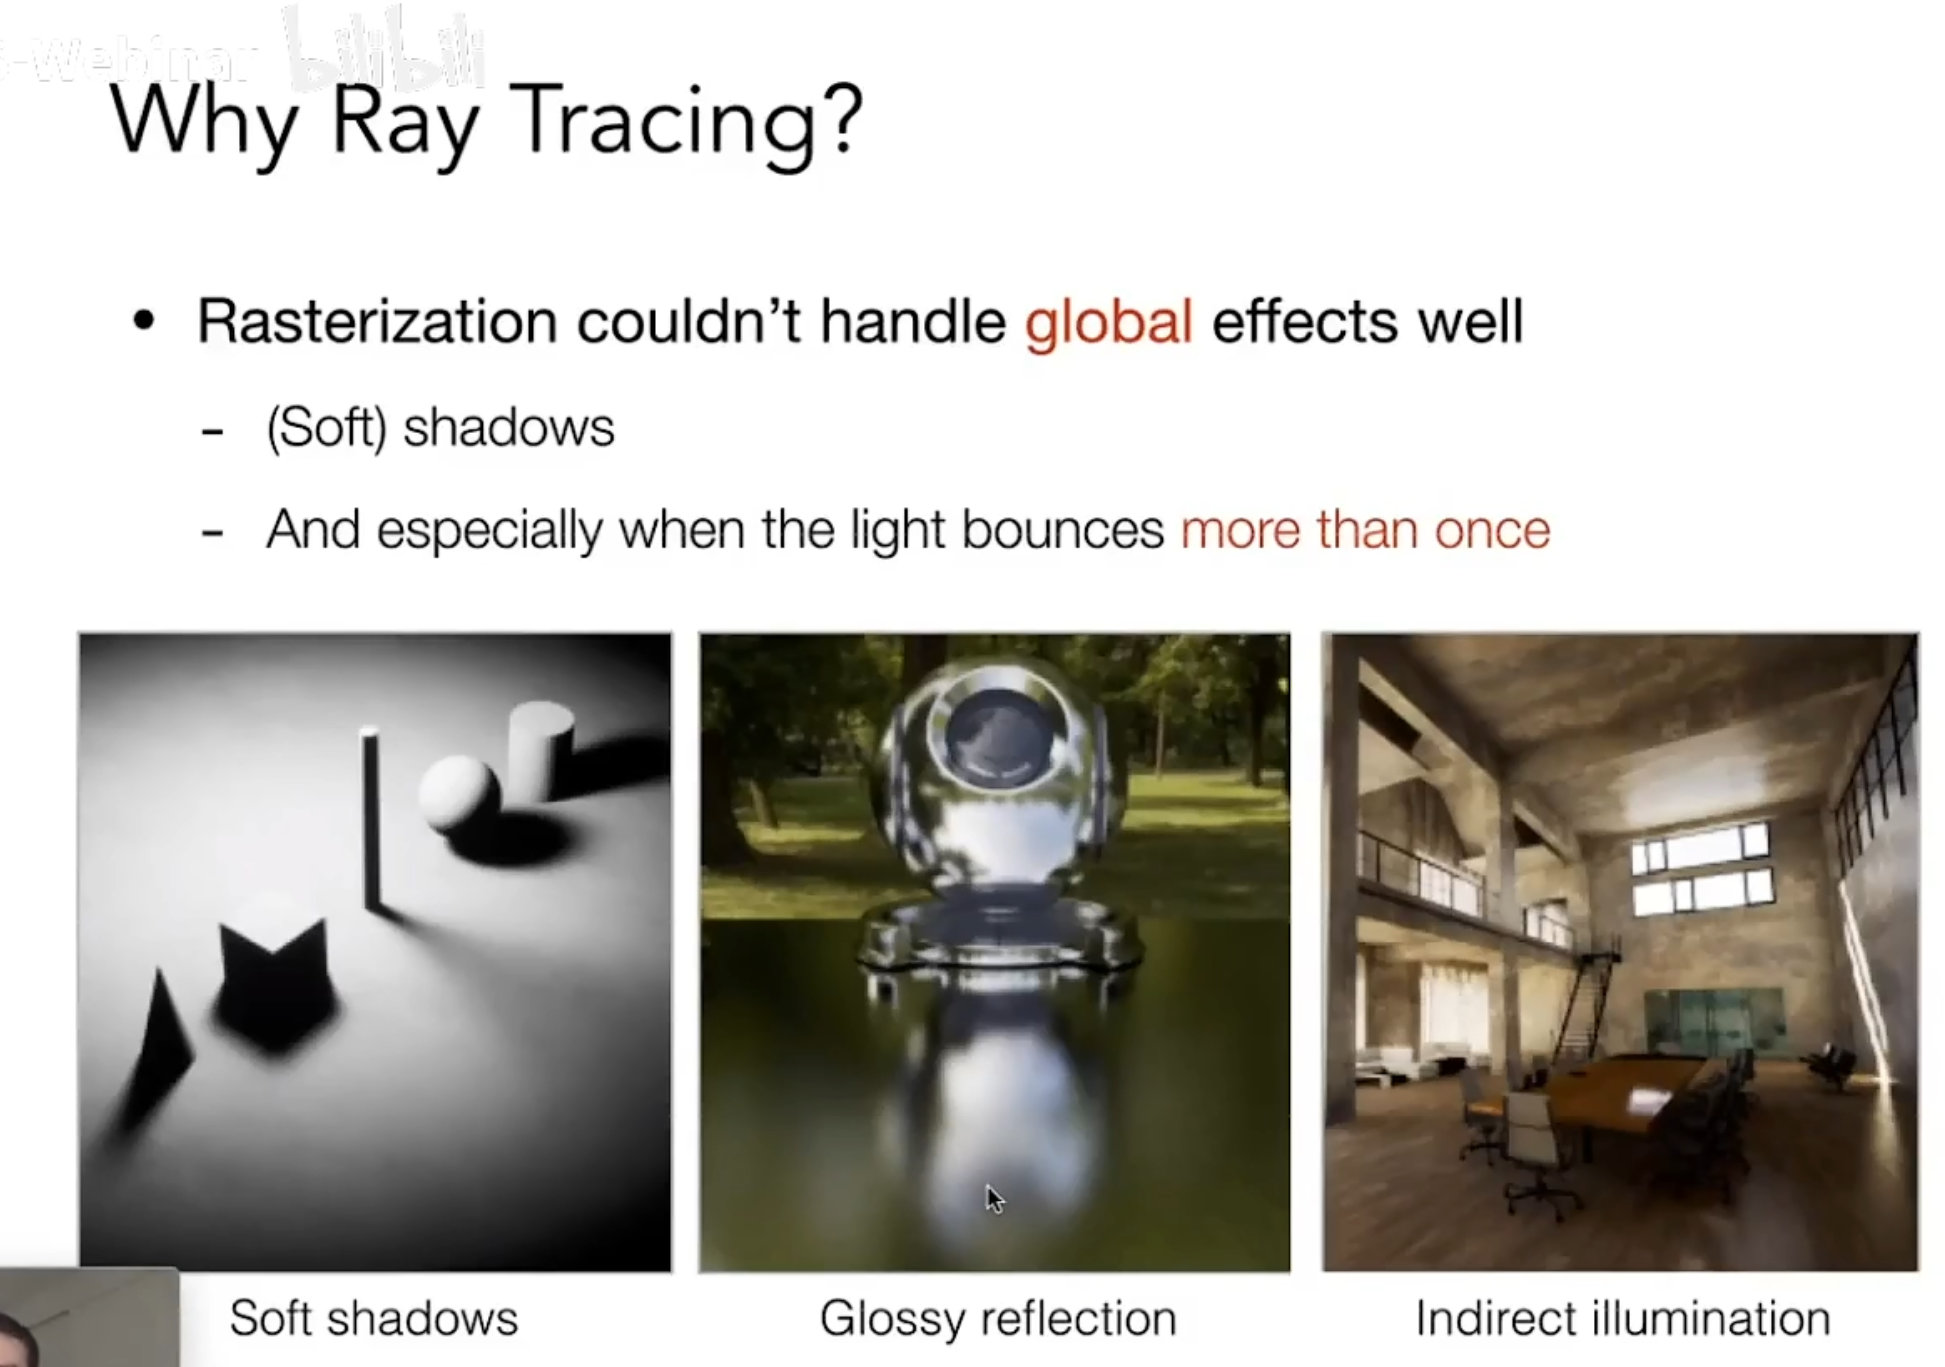
Rasterization could’t handle global effects well 光栅化不能很好的表现全局的效果 And especially when the light bounces more than once 光栅化无法很好的处理光线在场景中反射了不止一次的情况 (Soft)shadows 不能很好的表示和软阴影 Glossy reflection 光泽反射 indirect illumination 间接光照 光栅化在处理多次反射的时候会比较麻烦,而且不能保证物理上的正确性。相当于光珊化是一种快速的近似。而光线追踪是非常非常慢的,很真实的图形,一般用于离线,比如动画的渲染。
Basic Ray-Tracing Algorithm
Light Rays 光线
Three ideas about light rays 1.Light travels in straight lines 光线沿直线传播 2.Light rays do not “collide” with each other if they cross 光路互不干扰 (though are wrong) 3.Light rays travel from the light sources to the eye(光路可逆)
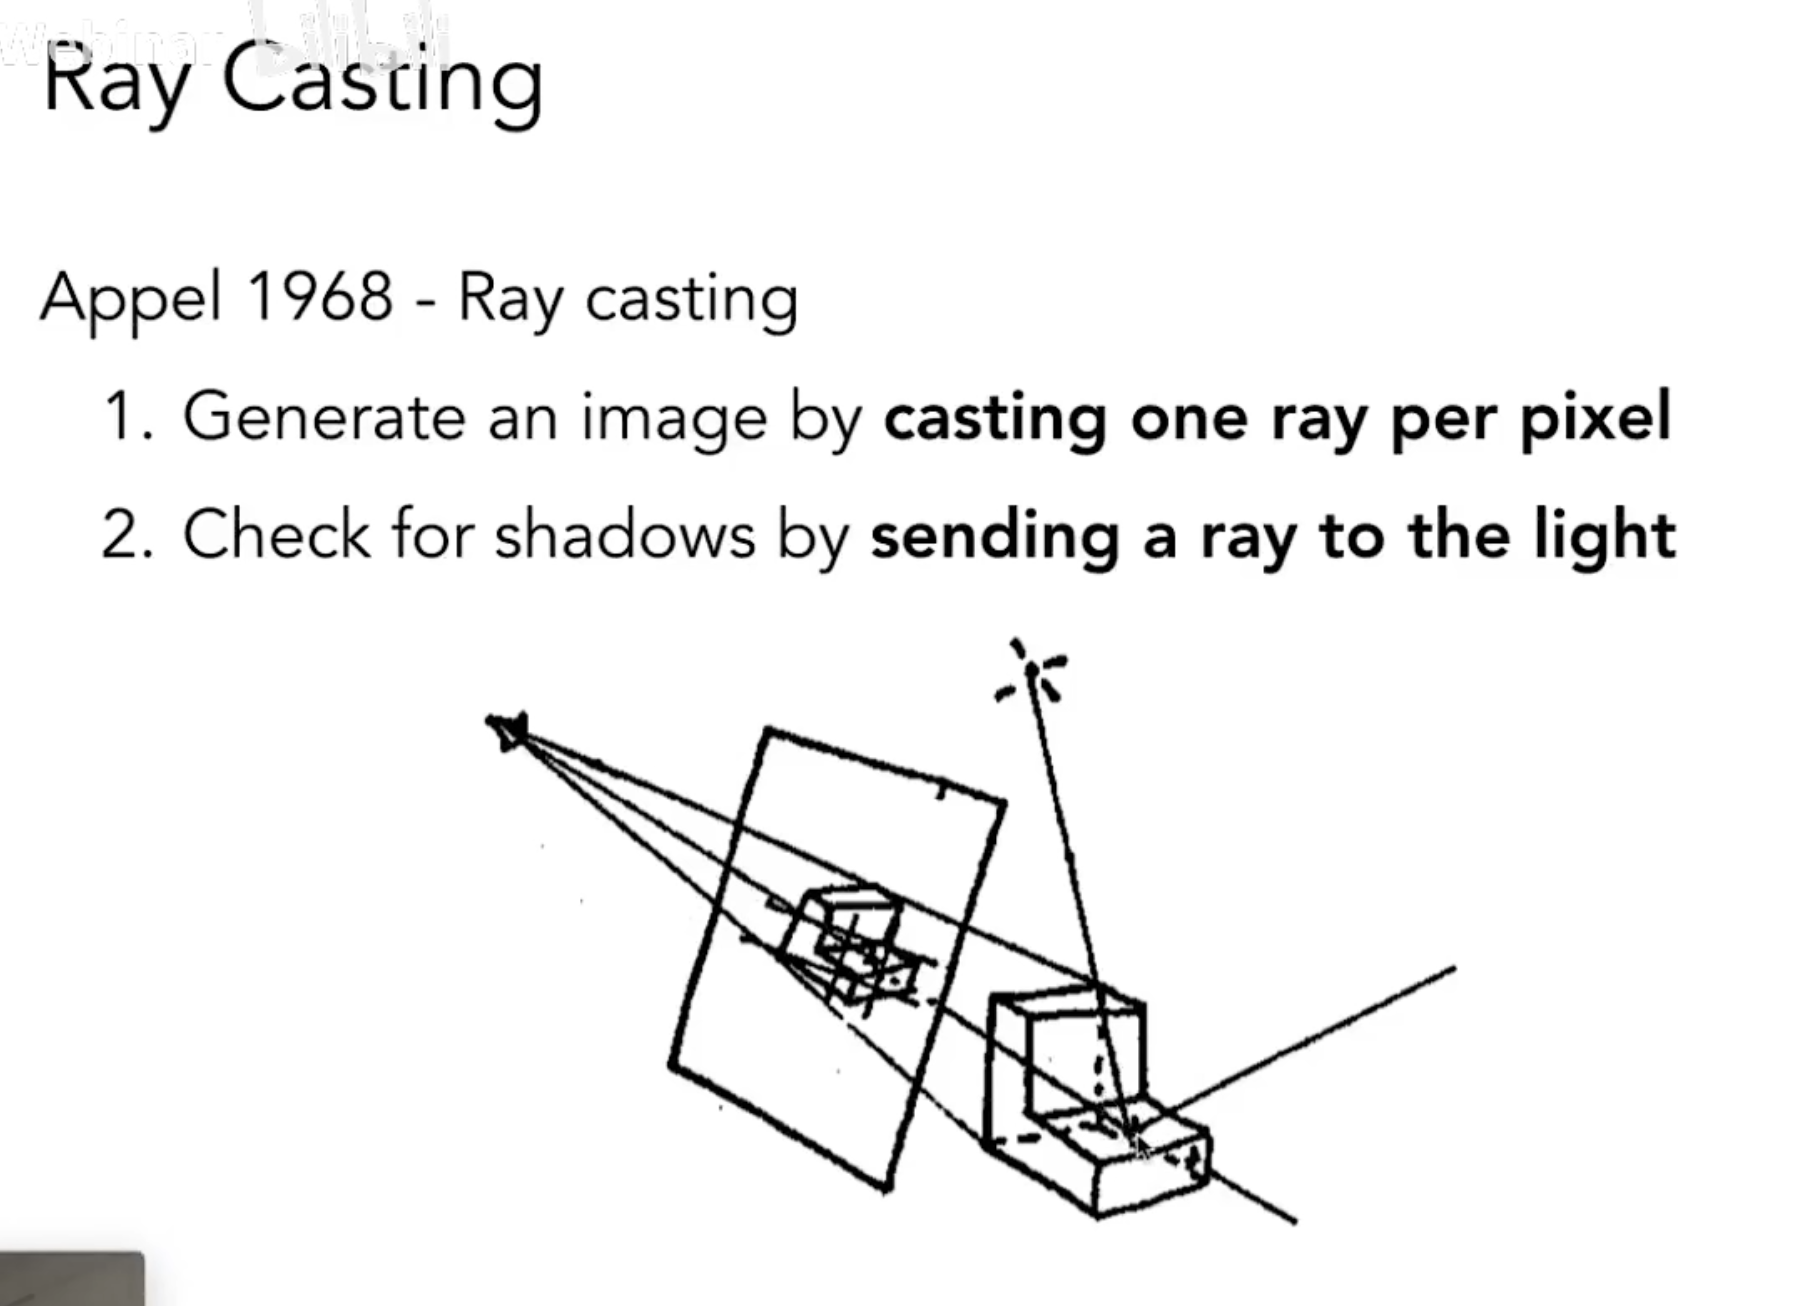
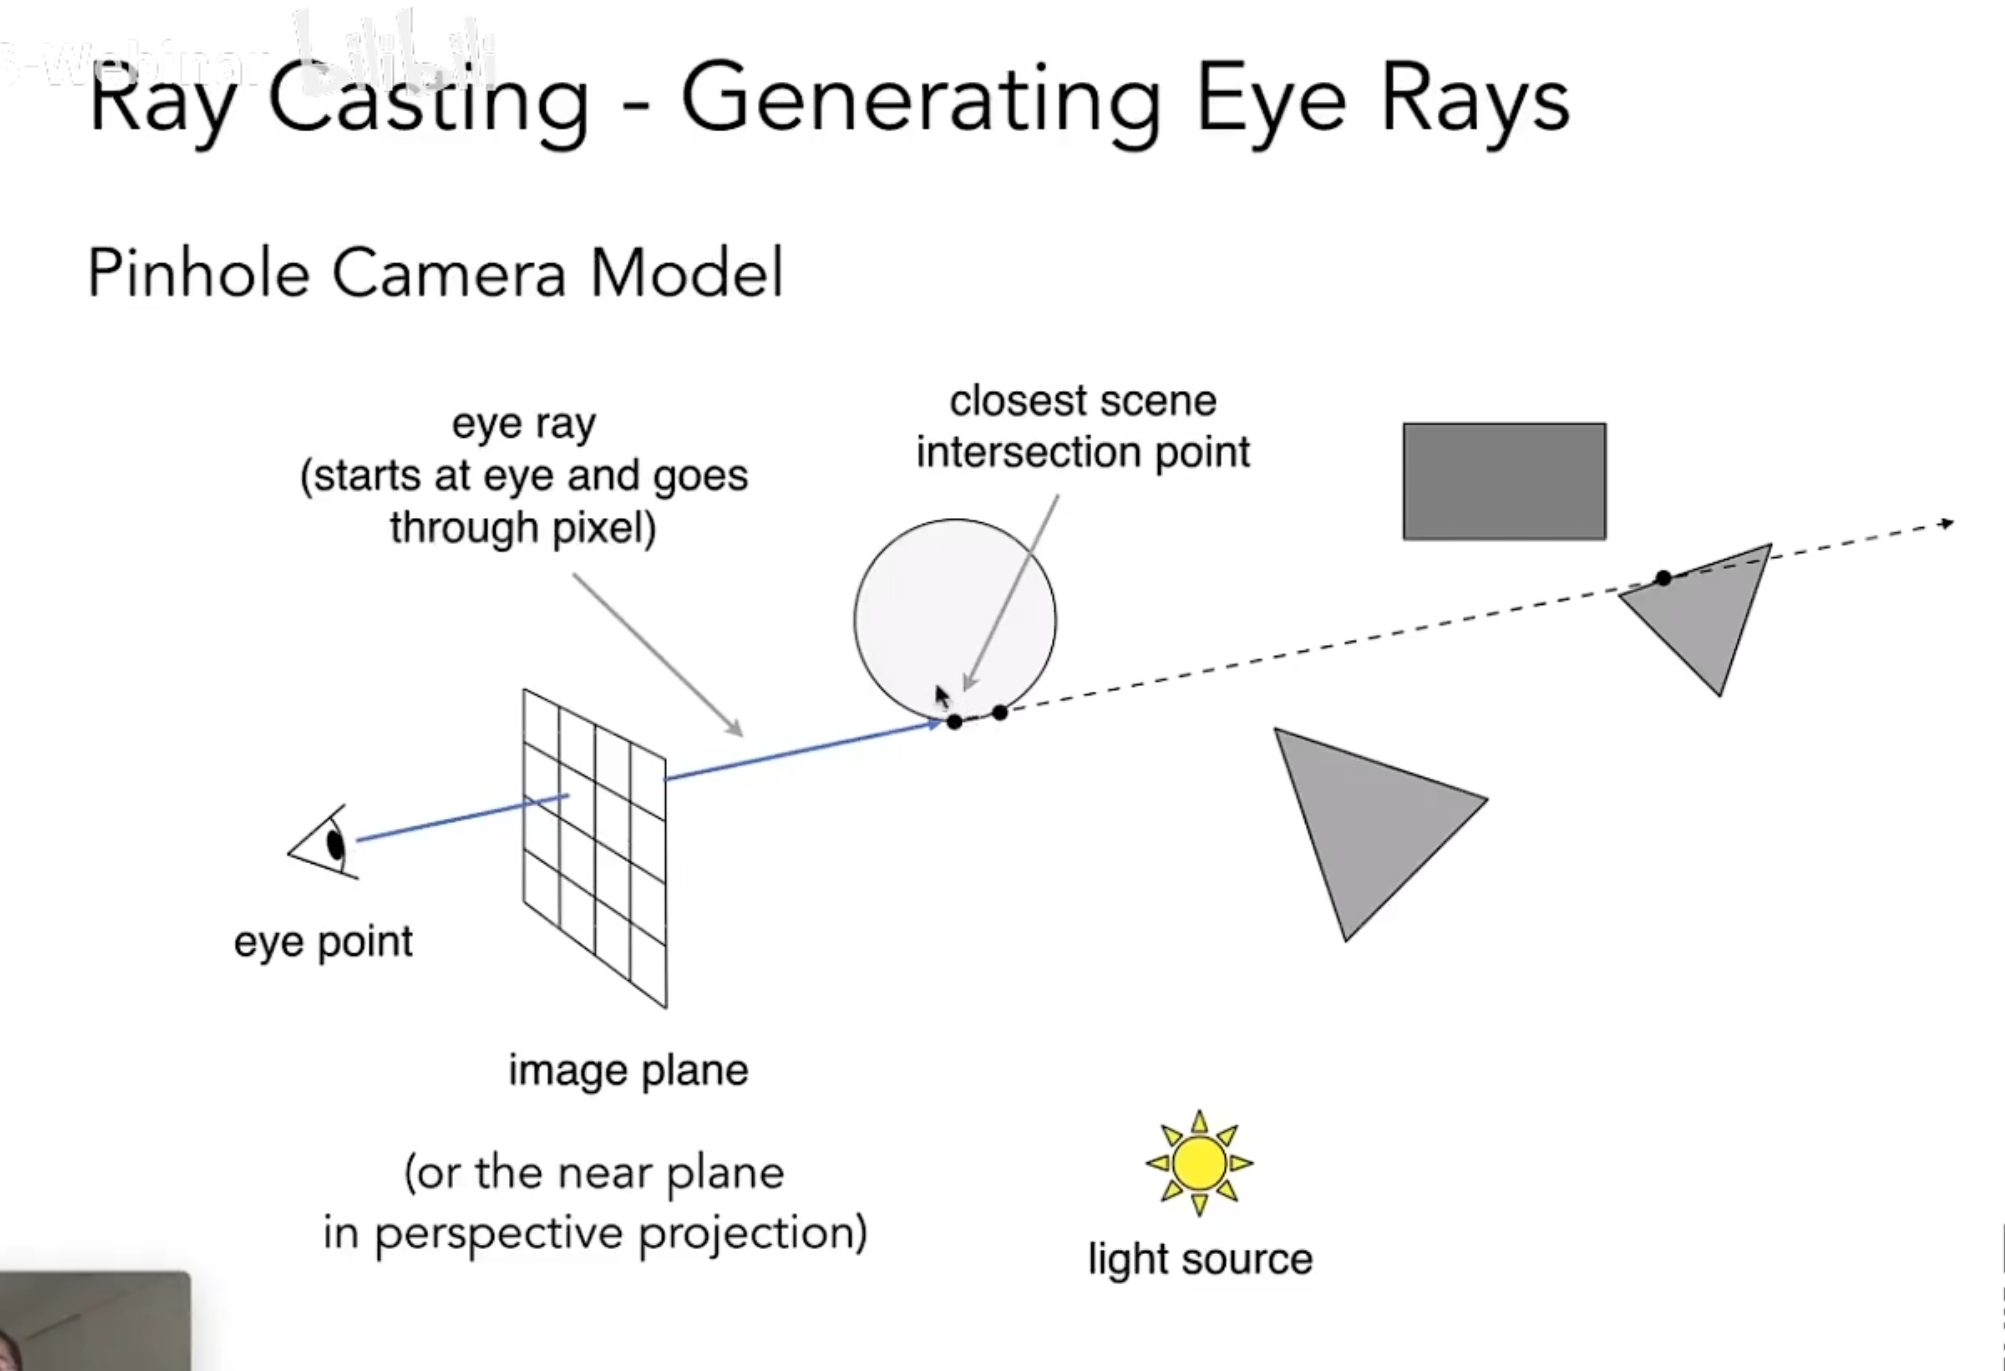
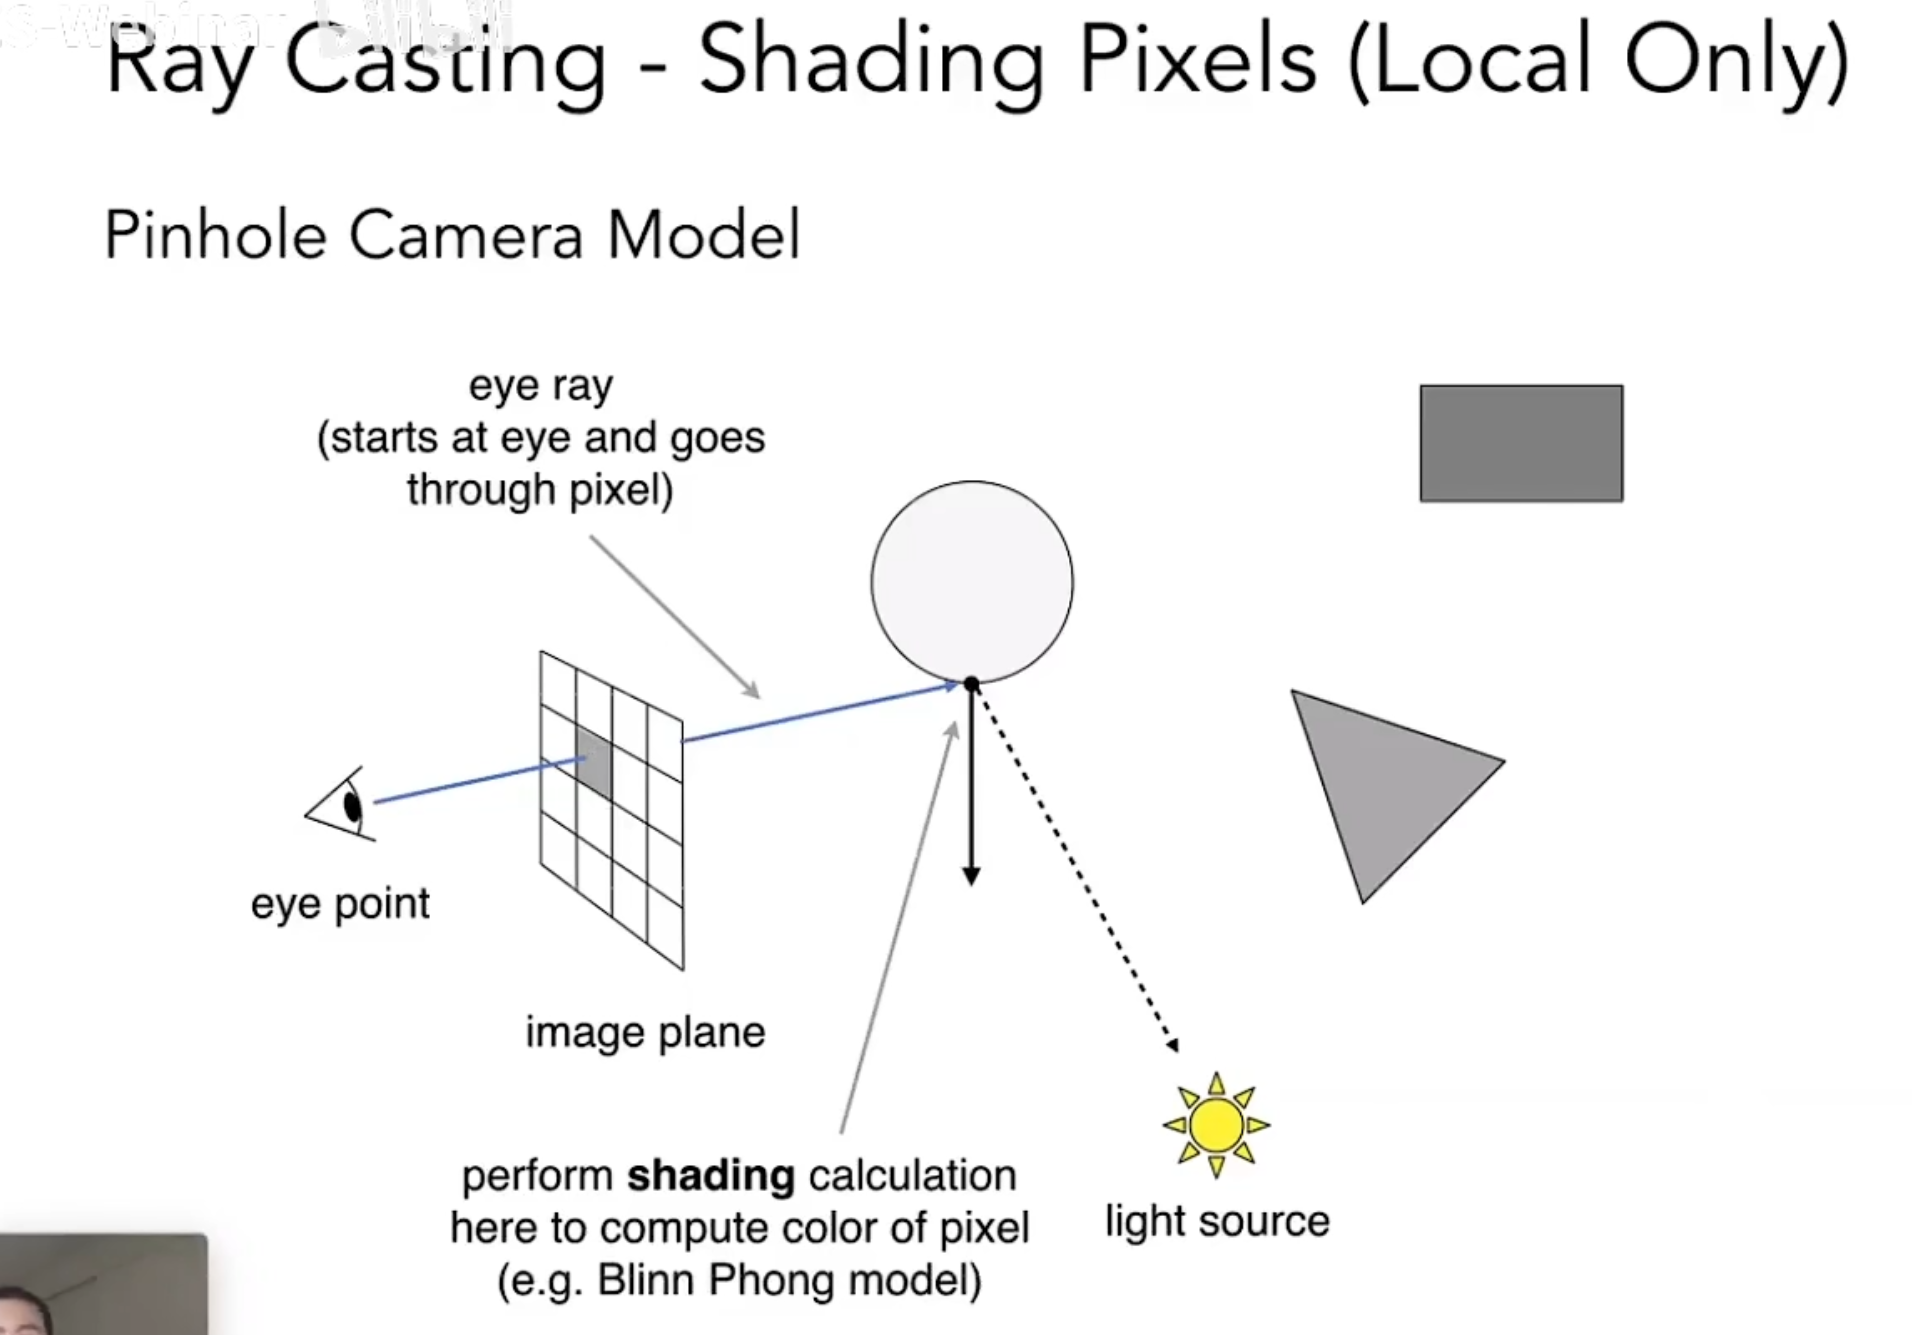
Ray Casting 光线投射
1.Generate an image by casting one ray per pixel通过每像素投射一条光线来生成图像 2.Check for shadows by sending aray to the light通过向灯光发送光线来检查阴影 在光线投射中,记录每一根光线碰到的第一个物体closest scene,那么就完美的解决了深度测试的问题,不需要再考虑深度测试。 找到一个交点之后,我们考虑这个点会不会被照亮,然后从这个点连一条线到光源,如果路径上没有阻挡,那么就可以说明这点被光照亮了,再利用法线进行着色Shading 这种方法光线还是只反射了一次。
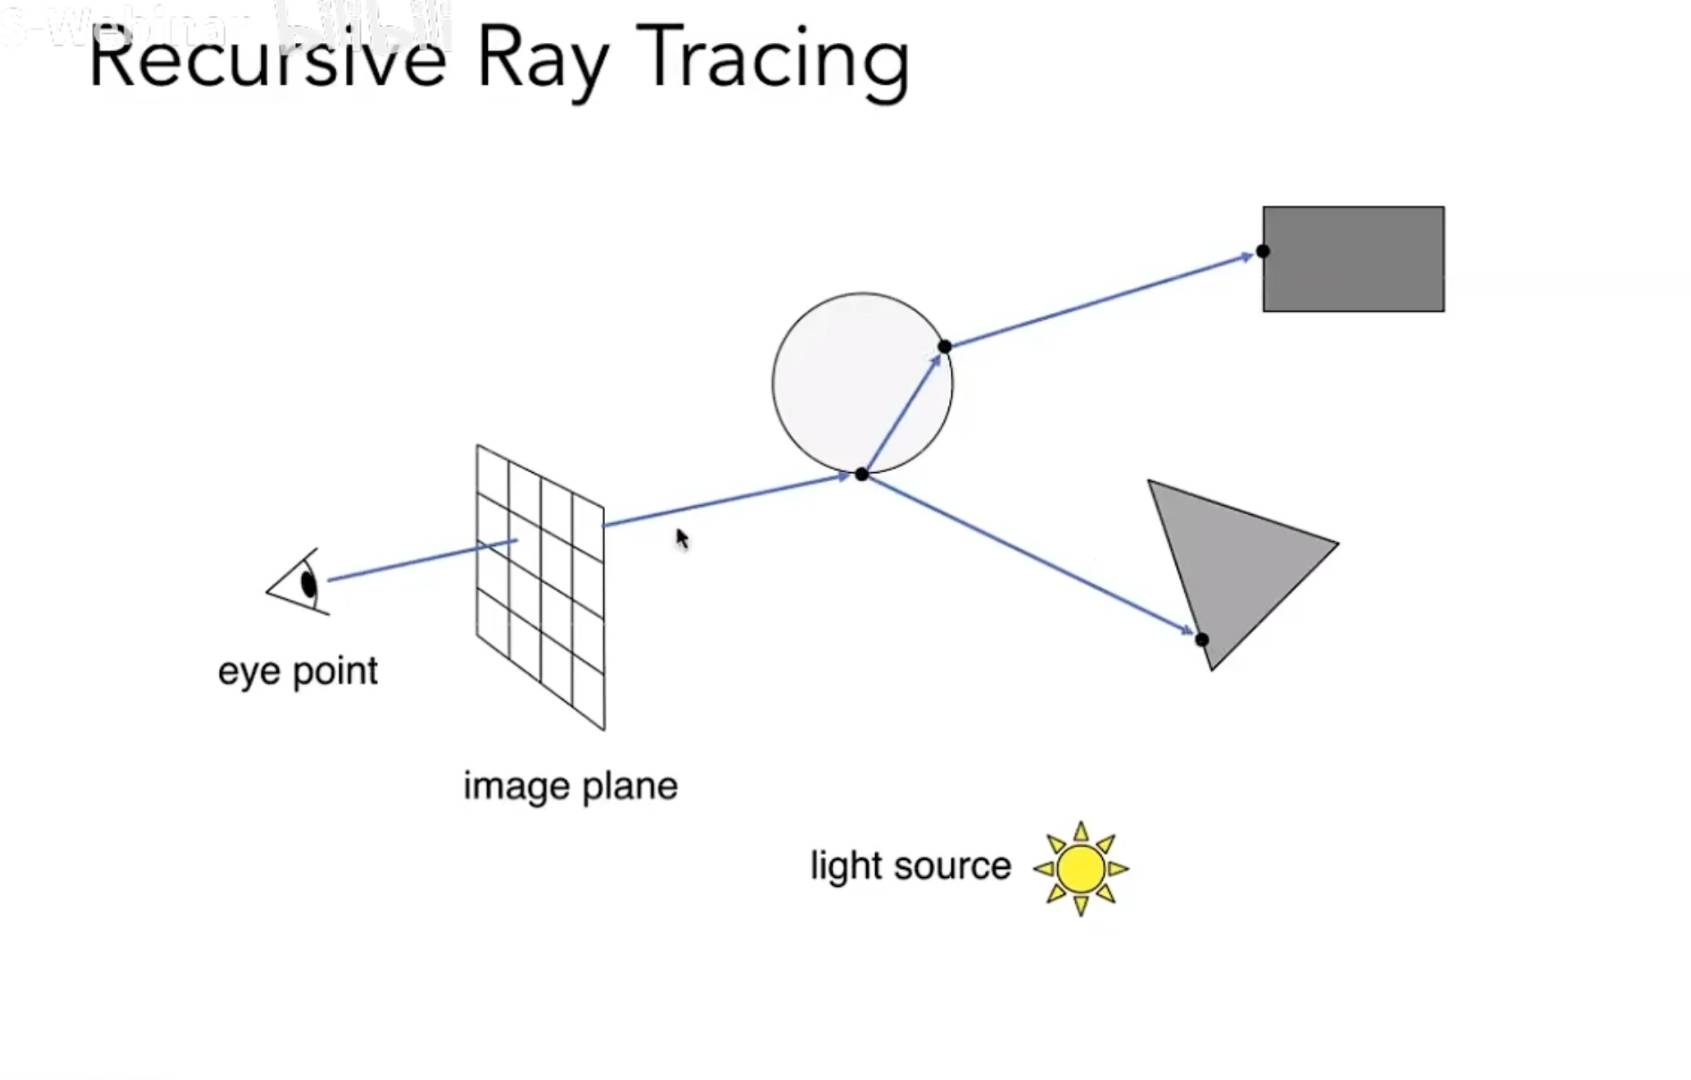
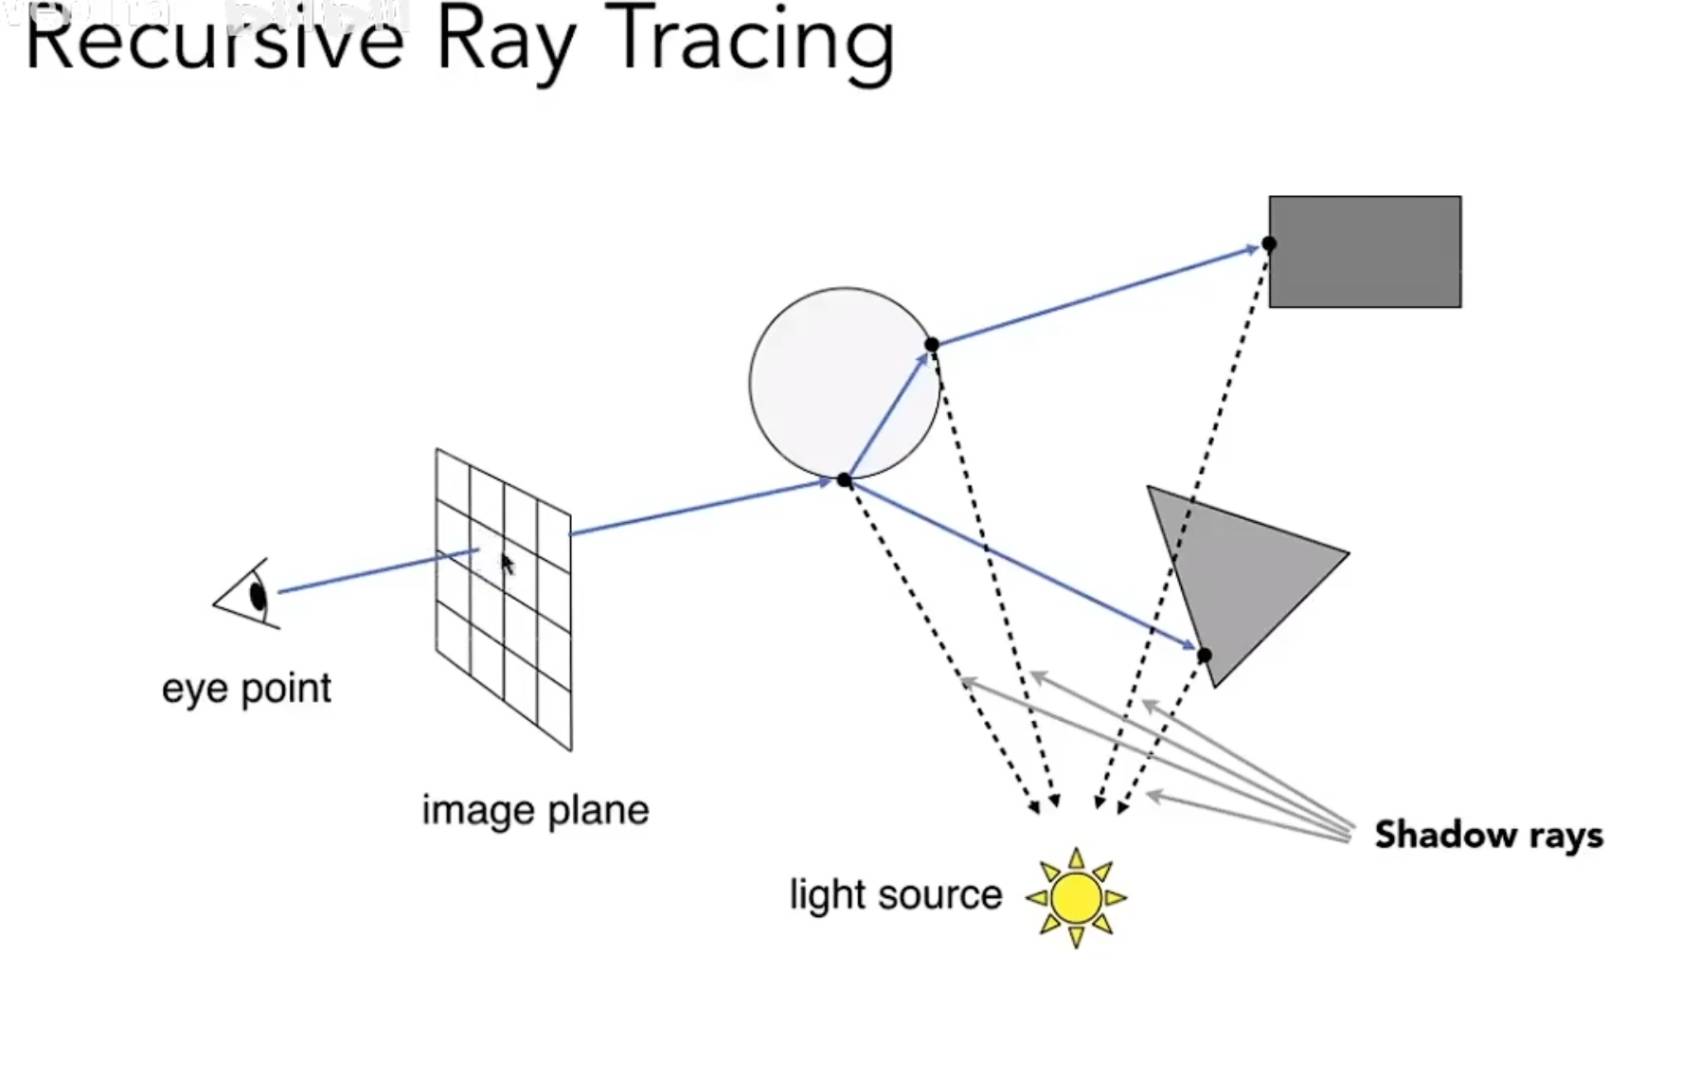
Recursive(Whitted-Style) Ray Tracing
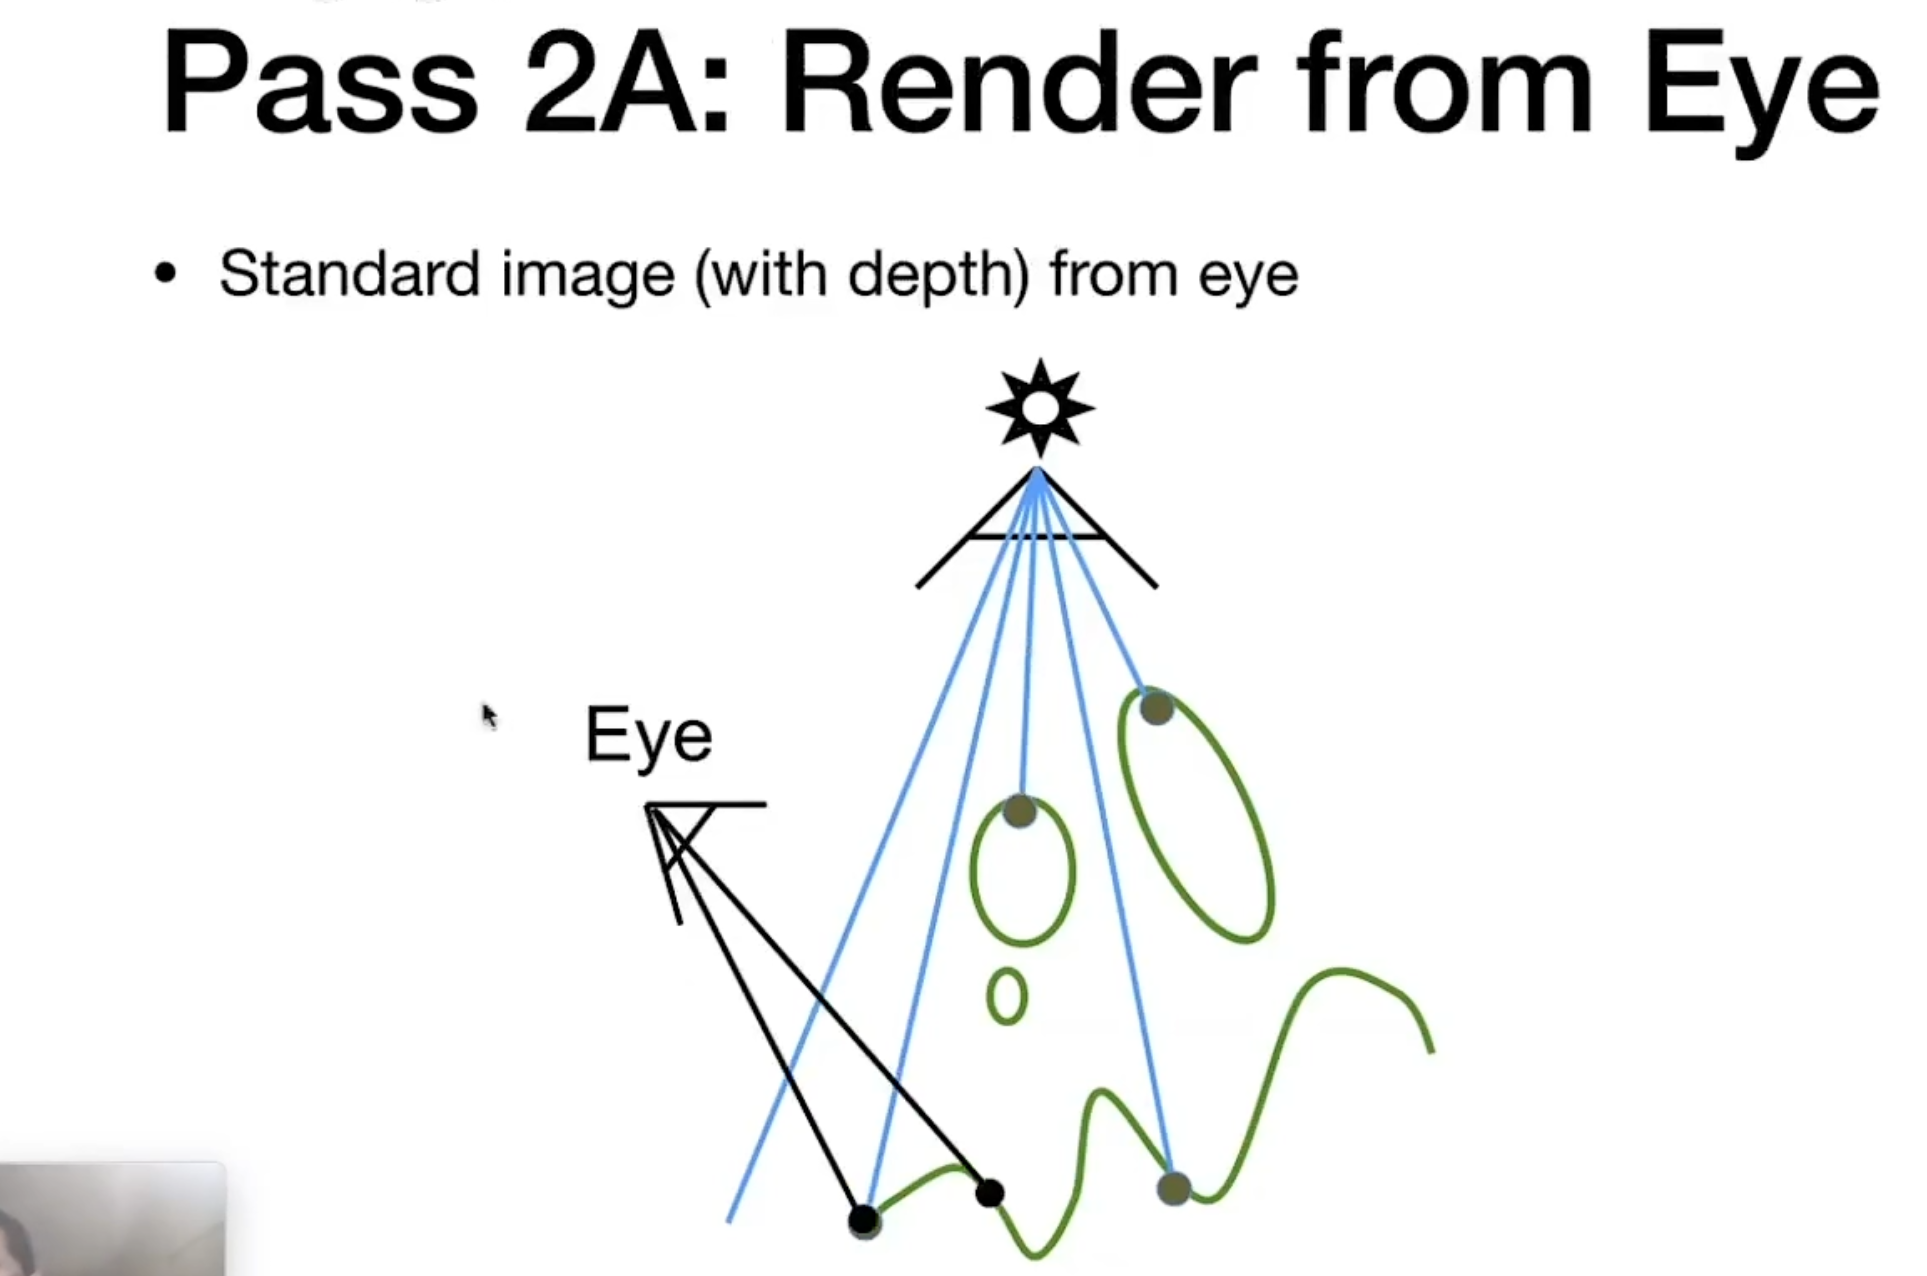
在光线投射的基础上,我们把从像素出发的点在碰到物体之后进行反射和折射。 最后的着色则由各个点的着色的加权叠加组成,每一个点都需要计算它的shadow ray
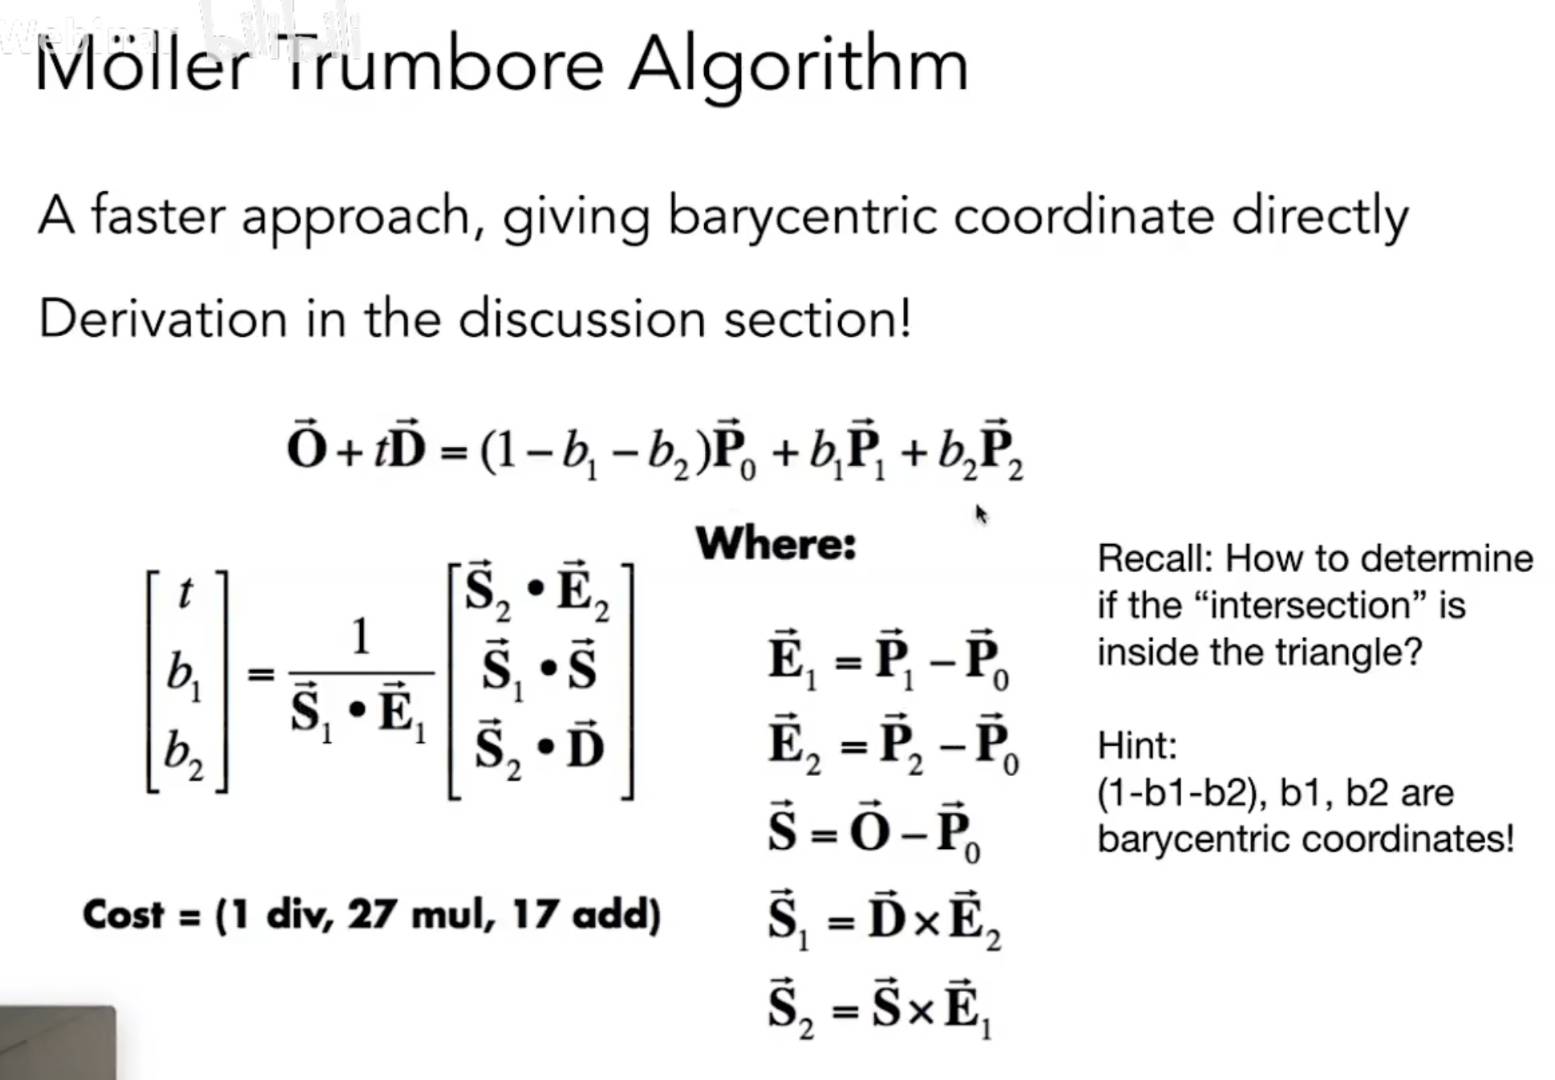
问题一:Ray-Surface Intersection(交点)
Ray is defined by its origin and a directino vector 光线定义为一个起点和一个方向向量 光线的方程:
\[Ray: r(t)=o+td,0<t< \infty \]
与最简单的图形球的交:
球:
\[p:(p-c)^2-R^2=0 \]
若相交,那么交点会满足两个方程,我们把光线的方程带入球的方程:
\[(o+td-c)^2-R^2=0 \]
然后解时间t,需要满足: 1.t是正的 2.t不是虚数 3.t得是最小的
与隐式表面的交:
隐式表面就是L:\(p:f(p)\)表示的一个方程 带入得到:
\[f(o+td)=0 \]
同样的需要满足,t是正的,t不是虚数 目前的求根的方法已经很发达了,所以求根不是问题
怎么计算交点?
Simple idea:jusr intersect ray with each triangle 直接计算每一个三角形与光线是否相交。(很慢,但有效) 把问题分解为两个小的问题: 1.光线经不经过三角形所在平面 2.光线与平面的交点在不在三角形内
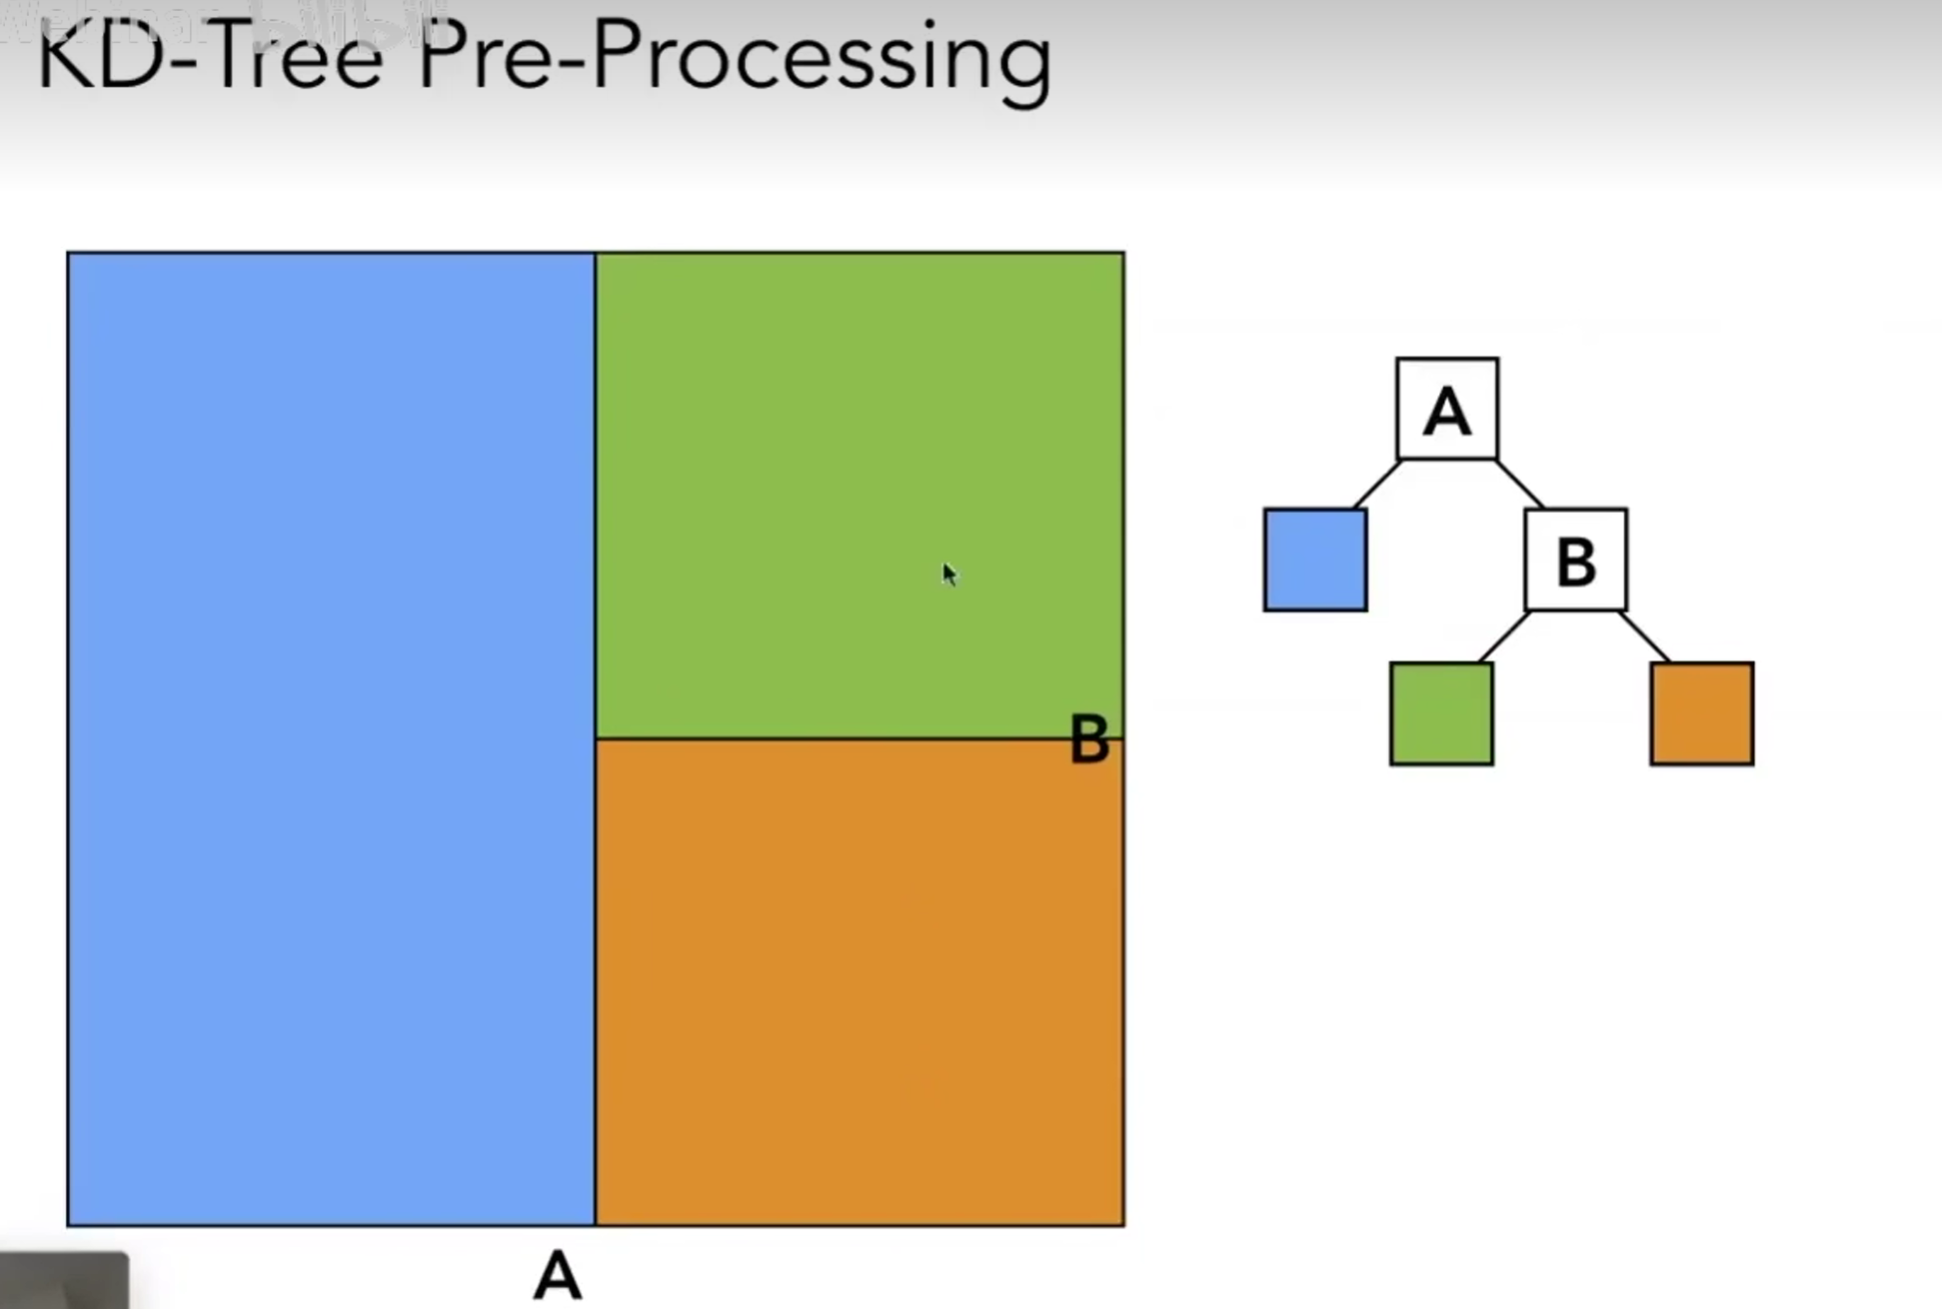
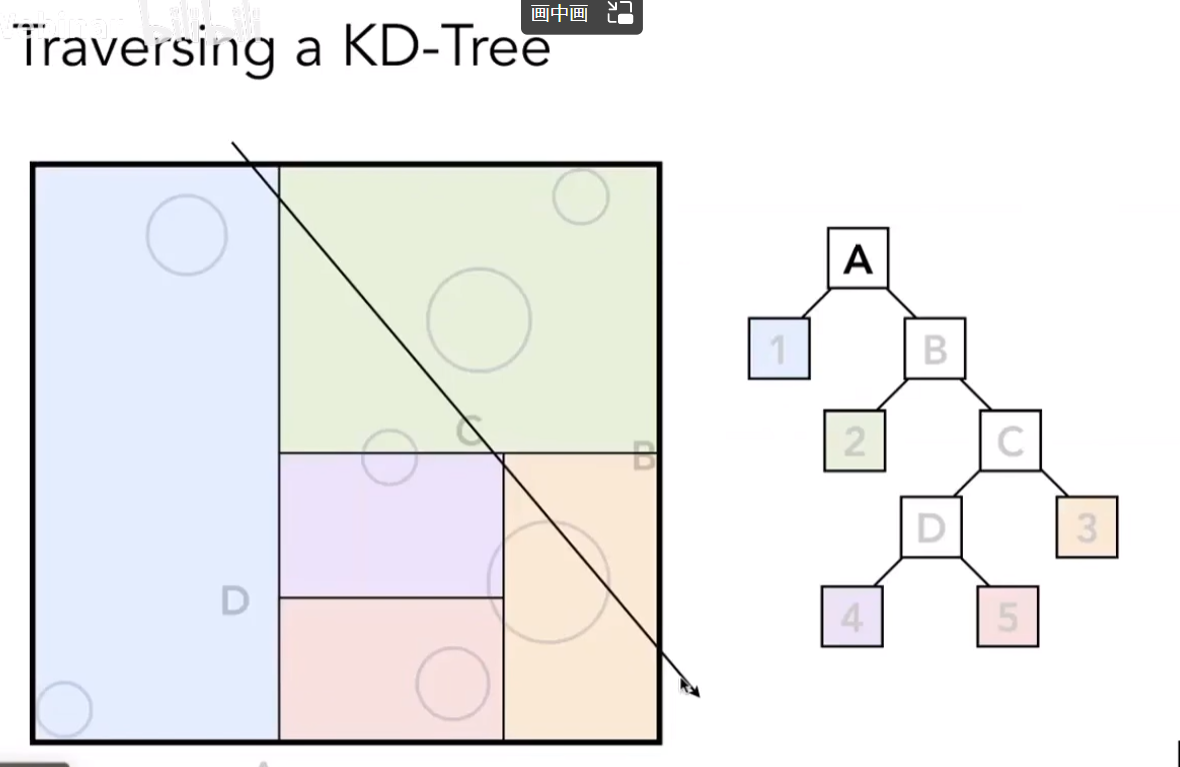
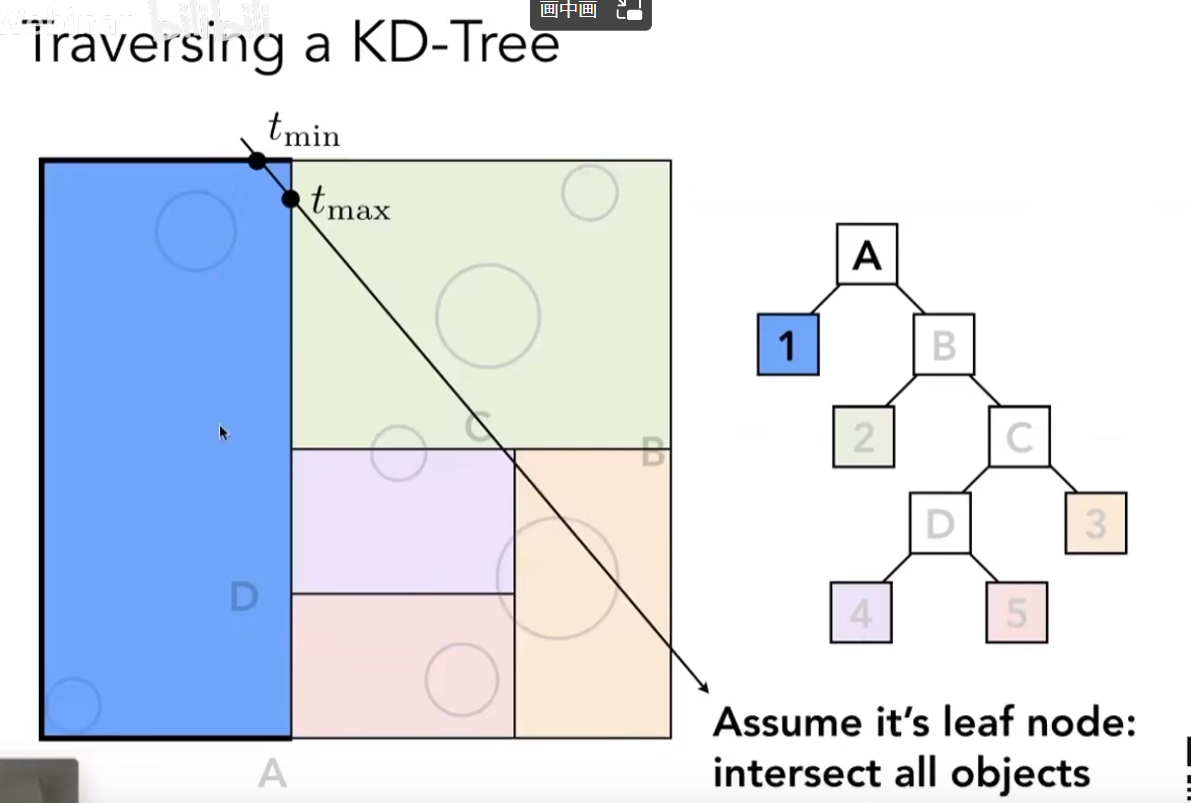
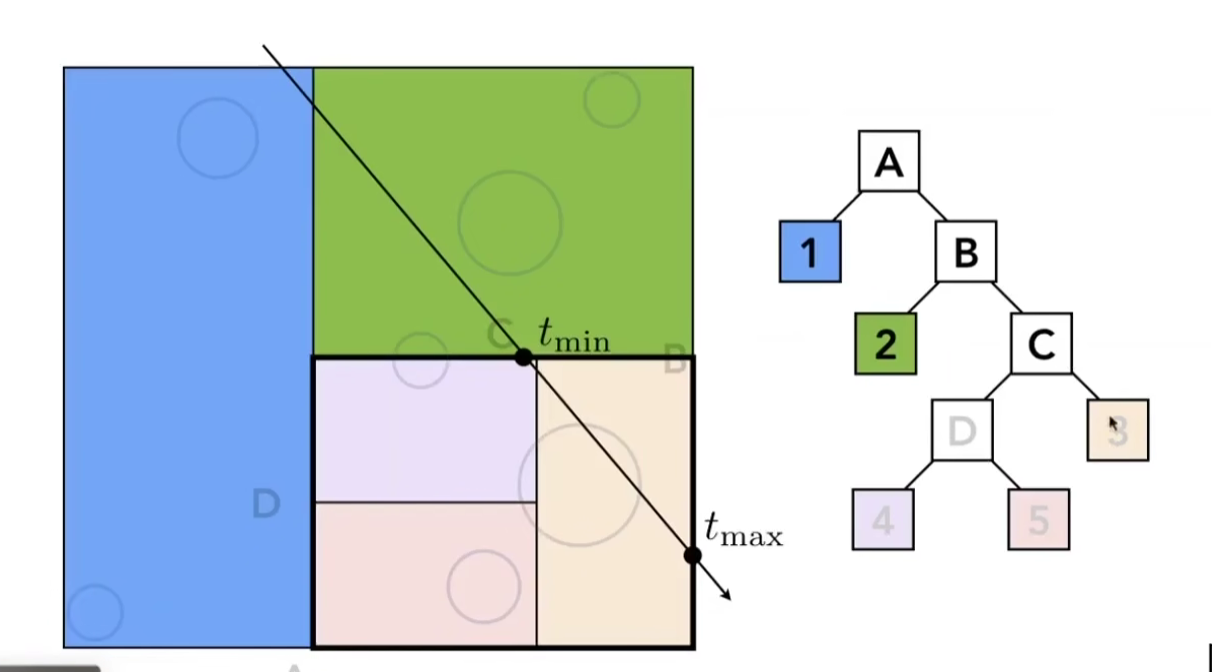
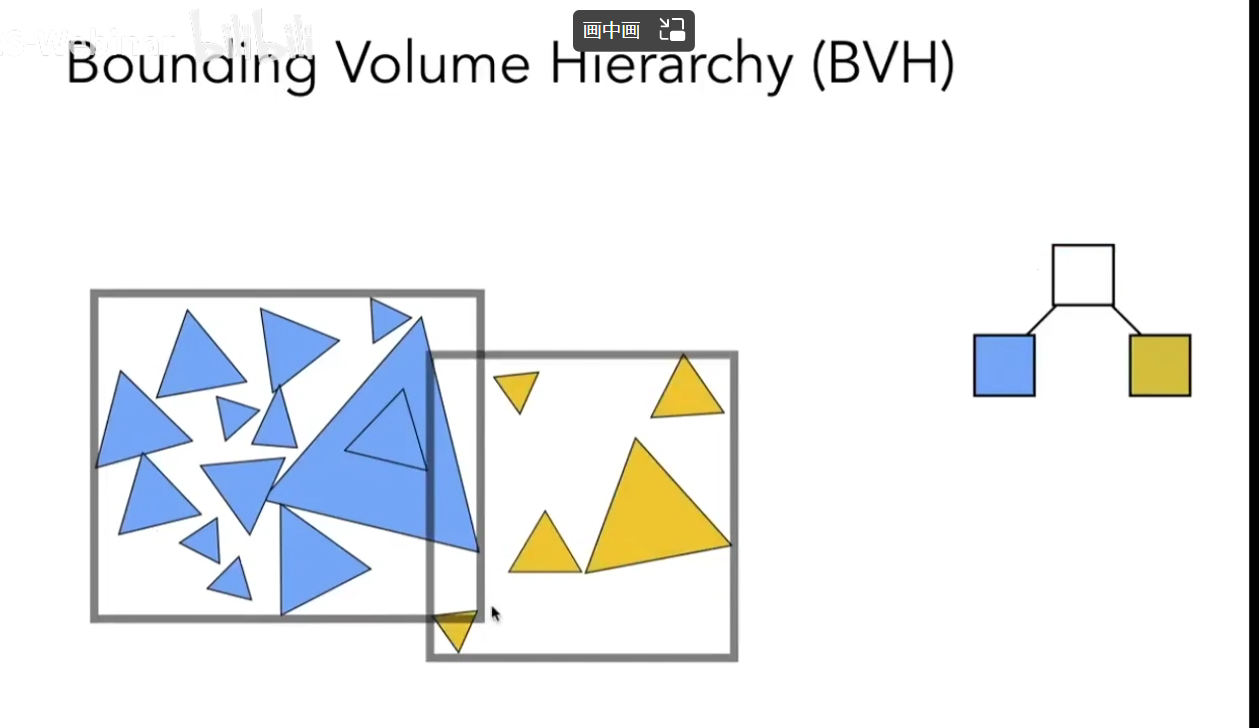
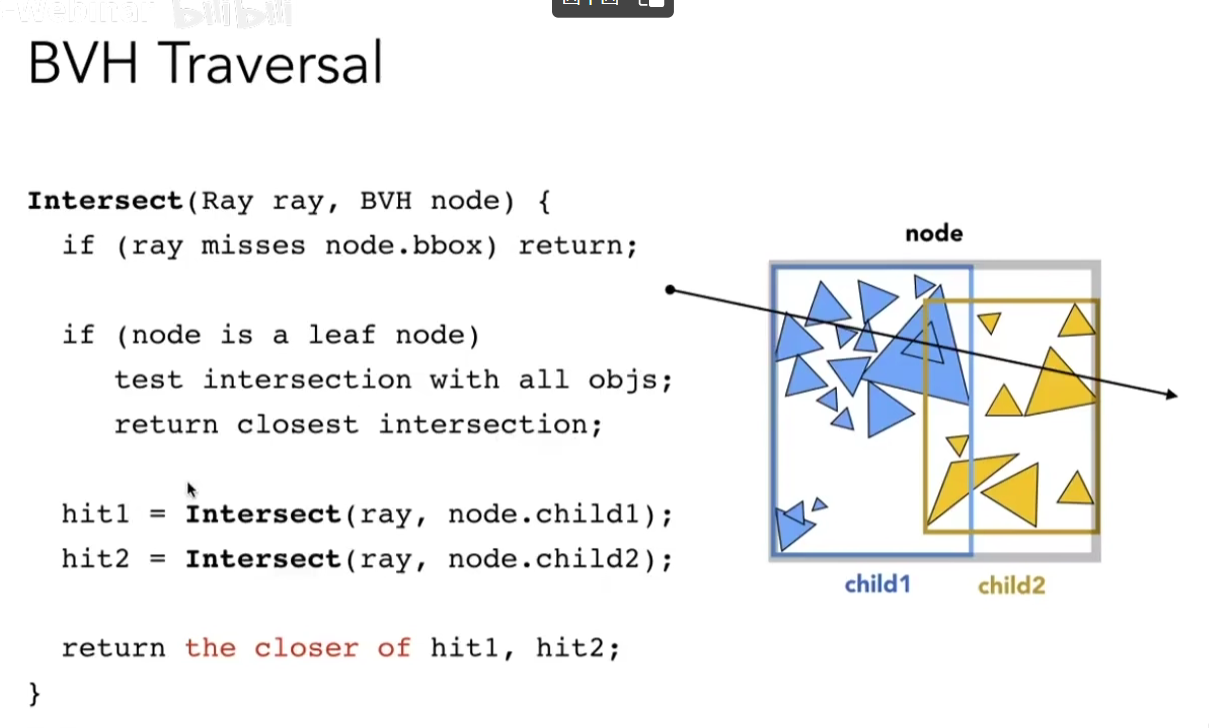
1.Object is fully contained in the volume. 2.If it doesn’t hit the volume, it doesn’t hit the object. 3.So test BVol first, then test object if it hits. 如果碰不到包围盒,那么肯定碰不到物体,所以首先测试包围盒,如果能碰到包围盒,再测试物体本身。
voidto(){ int sum = 0; for (int i = 0; i < n-1; i++) { for (int j = i + 1; j < n; j++) if (str[j] < str[i]) sum++; sav[i] = sum; sum = 0; } }
\(back()\)方法
1 2 3 4 5 6 7 8 9 10 11 12 13 14
voidback(){ memset(via, 0, sizeof(int) * n); for (int i = 0; i < n; i++) { int index = 0; while (via[index])index++; for (int j = 0; j < sav[i]; j++) { do { index++; } while (via[index]); } via[index] = 1; str[i] = index +1; } }
#include<cstdlib> #include<cstdio> #include<cstring> #include<cmath> usingnamespace std; int n, m; int str[10010],sav[10010]; int via[10010]; voidto(); voidback(); intmain(){ cin >> n >> m; for (int i = 0; i < n; i++) { cin >> str[i]; } to(); sav[n - 1] += m; int jin = 0; for (int i = 1; i <= n; i++) { sav[n - i] += jin; jin = sav[n - i] / i; sav[n - i] %= i; } back(); cout << str[0]; for (int i = 1; i < n; i++) { cout << " " << str[i]; } cout << endl; return0; } voidto(){ int sum = 0; for (int i = 0; i < n-1; i++) { for (int j = i + 1; j < n; j++) if (str[j] < str[i]) sum++; sav[i] = sum; sum = 0; } } voidback(){ memset(via, 0, sizeof(int) * n); for (int i = 0; i < n; i++) { int index = 0; while (via[index])index++; for (int j = 0; j < sav[i]; j++) { do { index++; } while (via[index]); } via[index] = 1; str[i] = index +1; } }